
Wii All Fused Shadows
This is the Wii All Fused Shadows route page for NA 1.0. BiTE setups will vary if other versions are used.
Start with all three files blank, as each will be used during the run.
Leaderboard for All Fused Shadows can be found here.
Ordon
It's optimal to do BiTE after Forest BiT to set EBF. If you don't want to deal with potential BiTE crashing in Forest Temple, see notes for doing death method in Addenda (only 2 seconds slower).
- Ordon Gate Clip
- Back in Time on Ordon Bridge
- BiT save on File 1 (re-enable pointer aiming only)
- Lantern
- [Lantern (B)]
- Save Talo
- Keep lantern out to waste fuel
- Goats
- Iron Boots
- Save on File 1 outside Bo's house
- Sidehop + slash for 50R in grass behind water wheel house
- Castle sewers (51R)
- Castle rooftops
- Sword & Shield Skip (55R+)
Faron Province
Collect as many miscellaneous rupees as possible from now through Goron Mines. Rupee count in route will reflect minimum guaranteed/reasonably expected.
- S. Faron warp portal
- Faron Vessel
- Kill first two bugs (leave tears)
- Bug on Coro's house
- Bugs inside Coro's house
- Dig under gate, kill bugs, enter loading zone after sound effect (leave tears)
- Tunnel
- Bugs on left wall (leave tears)
- Bugs in tree trunk
- Ignore bugs that dig
- EMS
- Save on File 2
- You can save at any point from the start of Sacred Grove, to right before the final hit in the Skull Kid fight
- Skull Kid chase 1
- Skull Kid fight 1
- Get RNG rupees (ideally 59R+, but there are backups later if not at 59R)
- Dig at dig spot for red rupee (79R+)
» Master Sword puzzle (RD UUU LL DDD RU)
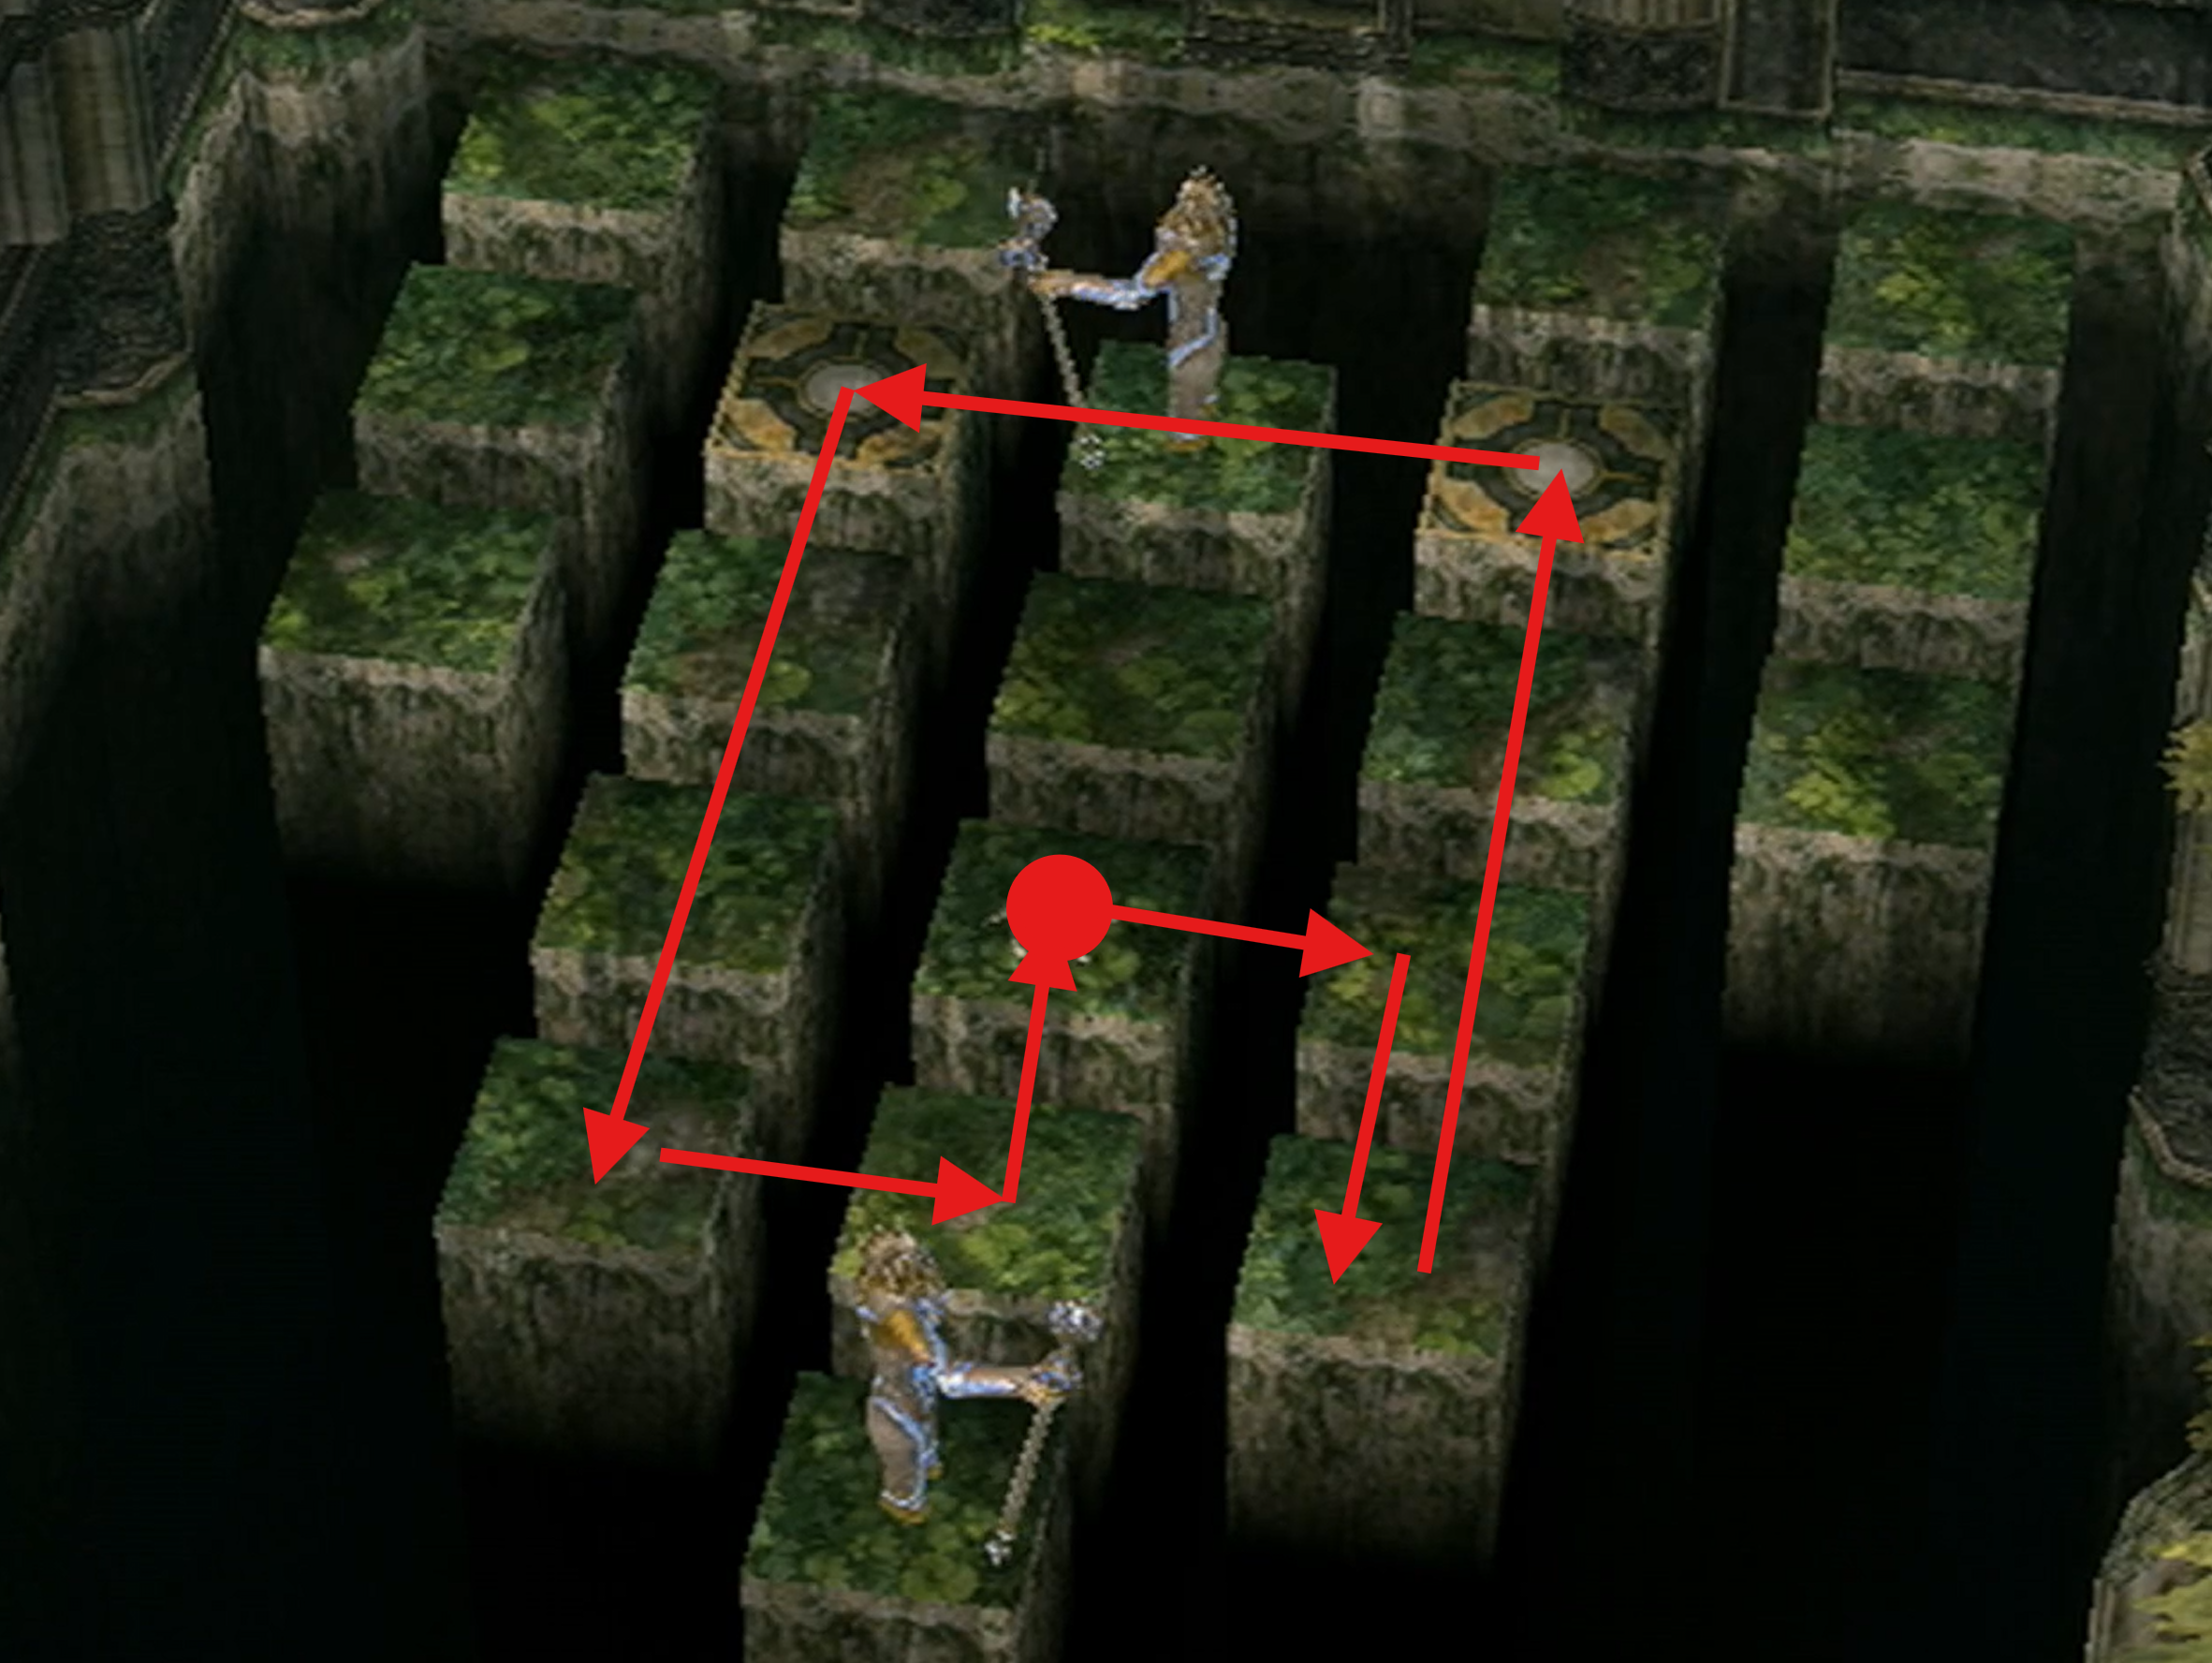
- Warp S. Faron
- Collect missed tears
- Enter the purple mist area and grab two tears
- Cross purple mist with lantern
- Transform and kill bugs before they dig
- While waiting for tears, dig behind sign and jump attack to collect a yellow rupee (89R+)
- N. Faron warp portal or skip portal
- Kill last two bugs
- Turn senses off, transform, and burn web
- Enter Forest Temple
Forest Temple 1
- Void once
- Save on File 3
- Forest BiT on Wii for EBF (load File 1)
- Kill one or both walltulas with deku baba nuts
- Alternatively, try to climb past one or both walltulas
- Light torches
- Void out at monkey chain to get rid of EBF
- Cross over monkey chain to Ook
- Ook
- Boomerang
- Savewarp on File 3
- [Boomerang (B) / Iron Boots / Lantern]
- Use Boomerang to kill Walltulas
- Cross to West wing
- Use boomerang to blow up rock
- Get ooccoo and 11R from pots (100R+)
- [Boomerang (B) / Iron Boots / Lantern / Ooccoo]
- Ooccoo out
- Collect Final Tears
- Text skip with 1-Frame Backflip
- Savewarp over File 3 (Say yes to continue and wait until fade-in to reset)
- Ordon Bridge + precautions, BiTE to King Bulblin 1
- KB1 Field + KB1 Bridge
Eldin Twilight 1
- Void out behind loadzone to reload area
- Or Enter + exit Sanctuary to reload area (<1 second slower)
- Kakariko Village warp portal as human
- Eldin Vessel
- Roll out of water before transforming to wolf
- Malo Mart Bug
- Elde Inn bugs
- 10R behind dresser (110R+)
- Backup greens in boxes if needed
- Abandoned house bug
- Break boxes for rupees (113R+)
- Barnes' Bombs bug
- Wolf Bomb House Skip
- Watchtower bug with blue rupee and RNG rupees in pots while waiting on tear (120R+)
- DMT bug
- Death Mountain warp portal
- If the portal fight was quick, kill the nearby bug but leave its tear; this should leave time to make the steam cycle without waiting
- If the portal fight was slow, skip the nearby bug entirely
- Farthest Death Mountain bug
Getting to Goron Mines
- Warp S. Faron
- Use Midna to warp for all of the warps in this run
- Dash to Coro
- Consider saving here (on File 3) for safety, as failing Text Displacement makes the remainder of the route impossible
- Coro Text Displacement
- Buy Oil Bottle (20R)
- 1-frame Ooccoo Jr. pull
- Ooccoo out of Forest Temple
- Warp Death Mountain
- Early Elevator (wolf method)
- Elevator Escape (transformation method)
- Advance Gor Coron's text three times
- Roll to clip past gorons
- Enter Goron Mines
Goron Mines
- Skip the first two flame jets
- Climb Ladder
- 20R from small chest if <20R
- Damage boost through third flame jet
- Kitty climb
- Main room with moving magnets
- Underwater small key
- Clip through gate as wolf
- Transform to Human
- Skip cutting bridge down (pot jump method)
- Alternatively, climb up magnet wall and cut drawbridge (~12s slower)
- Outside area small key
- Enter east door
- Skip Key Shard 2 without boomerang
- Alternatively, get Key Shard 2 (~40s slower)
- Dangoro
- Hero's Bow
- [Bow (B) / Iron Boots / Boomerang / Lantern]
- Big Key (Shard 3)
- 50R chest behind Elder 3 (70R)
- Return to outside area
- Beamos Skip with Moon Boots
- Activate magnet and get on
- Fall from magnet onto dock by drawbridge
- Room before Fyrus
- Fyrus fast fight
- Exit Goron Mines
- Don't need Heart Container
- Lantern to B
Eldin Twilight 2
- Transform wolf
- Enter Graveyard
- Kill Graveyard bug
- Transform human and light torches for purple rupee chest (120R)
- Collect tear
- Well Clip
- Basement bugs
- Collect tears as human
- Vessel complete
Lanayru Transition
- Get on Epona (mount on her left) and dash to Barnes' shop
- If <120R, get red rupee by boomeranging box on high scaffolding on west side of Kakariko Village on the way to the bomb shop
- Buy Bomb Bag for 120R (0R)
- [Lantern (B) / Iron Boots / Oil Bottle / Bombs]
- Exit shop
- Can begin wasting bombs now if desired; dropping bombs isn't super tight however
- Epona to north exit to Hyrule Field
- Take out lantern to waste fuel
- Ride into mailman trigger
- Epona through Bridge of Eldin
- Epona to void floor with lantern refill (need less than half fuel)
- If failed, resort to Midna call method
- Alternatively, bomb arrow the rocks and ignore the resulting messengers
- Dash to edge of green wall to enter the twilight
- Dash to Hyrule Field North, CT Field bypass, then east to Great Bridge of Hylia
- Drop into Lake Hylia as wolf
- Midna dive with bomb or pot to enter lakebed
Lakebed Temple
It's optimal to do pot push to early Deku Toad (>1 minute faster). For notes on doing Lakebed without pot push, see Addenda.
Either way, you want to waste regular bombs throughout the Clawshot segment (save a few for Deku Toad, but plan to have 0 after).
- Savewarp on File 3
- Load file 2 (Sacred Grove)
- Howl at stone, skip CS, reset to set EBF
- Load file 3 (File # no longer matters)
- Pull lever in first room
- [Lantern / Iron Boots / Bomb Arrows (B) / Boomerang]
- Drop stalactites with bomb arrows
- [Lantern / Iron Boots / Bombs (B) / Boomerang]
- Staircase room
- Down stairs, around, pull south lever
- Up stairs, west side, jump off the edge and slide off awning to the lower floor
- Enter single cog 1F room
- Pot Push to Deku Toad
- If failed, reload the room to reset the pots
- Enter Deku Toad room from exit door (EBF active)
- [Lantern / Iron Boots / Bomb Arrows (B) / Boomerang]
- 0-cycle with Master Sword and bomb arrows
- Clawshot
- [Clawshot (B) / Iron Boots / Bombs / Boomerang]
- Savewarp
- Finish emptying bomb bag
- Open chest for 10 WB
- Backtrack to central staircase room
- Boss key skip
- Bridge Clip (10-15s faster) or Vine Clip
- Morpheel with water bombs
- [Clawshot (B) / Ooccoo Jr. / Bomb Arrows / Boomerang] on final regrab
- Exit Lakebed Temple
Forest Temple 2
- Skip two cutscenes
- Ooccoo back into Forest Temple
- Burn web with BA
- Clawshot to boss key
- Target 3 propellers to open gate
- Cross outdoor area and bridge room
- In monkey chain room, turn the nearest bridge once and cross, then clawshot the vines near the boss door
- Diababa ookless with bomb arrows
- End on saying 'Yes' to Midna
Addenda
Death for Forest BiT EBF
If you don't want to deal with Wii BiTE crashes for Forest BiT, dying for EBF is only about 2 seconds slower overall:
- After Iron Boots, no need to save outside of Bo's house
- Once entering Forest Temple, no need to void out
- Once on the title screen after Forest BiT, perform death method to set EBF
Alternative to Pot Push
EBF is set, Lakebed file has been loaded:
- Pull Lever
- Drop Stalactites with Bomb + Boomerang
- Staircase Room (no Ooccoo)
- Down stairs, around, pull south lever
- Up stairs and pull right lever
- Down stairs and enter hallway
- Enter Single Cog 1F Room
- SK Chest
- Backtrack to Center Room + Locked Door on 2F
- Boomerang + Bomb Stalactite
- Cross Vines to Door
- Head to Deku Toad on Wii
- Hang, Drop + JS to Land On Platform To Door (Semi-Precise)
- Early Deku Toad
- EBF From Early Monkeys Still Active
- 1 Cycle With Master Sword
- Clawshot (E Clawshot^Boomerang)
- Savewarp
- Finish Emptying Bomb Bag
- Open Chest for 10 WB
- Backtrack to Central Staircase Room
- Clawshot Vine Clip
- Routes merge at Morpheel (⮤ return to route)