
Any% (Beginner)
This is an updated version of the Wii Any% Beginner Route. It should work on all Wii versions of the game, including NTSC 1.2 and the KOR Wii versions. This route avoids some of the tougher tricks, including:
- Sword and Shield Skip
- Back in Time Equipped
- Faron Escape
- Empty Lake Hylia sequence
- Morpheel without Zora Armor
- Death Sword Skip
- City North Fan Activation Skip
Major tricks:
- Early Master Sword
- Lanayru Gate Clip
- Duplicating the Lent Bomb Bag as Wolf
- Pillar Clip into Lakebed Temple with ZA
- Lakebed Boss Key Skip (Vine clip method)
- Poe Gate Clip
- Early City in the Sky
- Fan Trigger Skip for early boss key
- Get to Aeralfos early with 3pcc
Also included but not as major:
- Early Boomerang via bridges
- King Bulblin 2 Fight Skip
- Early Boss Fights (for Early Deku Toad)
- Spinner Bomb Boost in Snowpeak Ruins
- Aeralfos Skip
Runs that use this route:
- 3:41:32 by An_D (1 Jan 2024) (outdated, but much of this run still matches this route)
Runs should start with a blank file in slots 1, 2, and 3, as all files are used during the run. The route below specifies which slot to use for each save, but other variations can be equally fast so long as (i) the Sacred Grove save is still available after saving in the entrance to Lakebed Temple and (ii) all blank slots are used by the end of the run.
See this page for common terms and abbreviations used in this route.
Refer to Addenda for additional notes on the route.
Ordon
- Start on File 1
» Go to Ordon Spring
- After the cutscene, you can turn around and roll forwards towards Epona to miss the Ilia textbox.
- Ride to ranch (3-13R)
- Ride through grass to try to get a blue rupee (RNG)
- Goats 1 (10 goats)
- Exit house
- If at 6R+, head straight to village
- If under 6R, sidehop right and pick up rock in grass behind Epona for blue rupee first
- Climb vines to eagle guy
- Get and deliver crib
- Fishing Rod
- [Fishing Rod (B)]
- Mailbox jump onto roof
- Two yellow rupees (~28R)
- Head to dock, collecting freestanding green rupees to reach 30R
- Catch two fish, cat cutscene
- Enter shop
- Speak for Bottle (Milk)
- Buy Slingshot (0R)
- Return to Ordon Spring area
- Ordon Gate Clip, enter Faron
- Roll to horse grass and call Epona
» Talk to Coro for lantern
- When on Epona, use one spur prior to jumping the fence, with the remaining 5 expiring just before turning the corner into Coro's area.
- If you target Coro and press A while moving towards him, you do not need to park Epona to begin the text.
- If you carry too much speed into Coro's area, you may jump over his campsite if you fail to talk to him.
- [Lantern (B) / Slingshot]
- Go through tunnel (put away lantern after 2nd web)
- Enter cave, get Small Key
- Exit cave, use Small Key on gate
- Save Talo
- Bokoblins break cage
- Kill Bokoblins with slingshot
- Goats 2 (20 goats)
- Leave Ordon Village, enter crawlspace to Ordon Spring (1R)
- Castle Sewers
» Castle Rooftops
- If you dash near a ledge and jump within 10 frames of dashing, your dash will not expire, allowing you to dash again upon landing. This is a **dash cancel**.
- Zelda cutscene
- Return to Ordon Village
- Listen to people by dock
- Scare eagle guy
- Ordon Shield in Pergie's house
- Ordon Sword in Rusl's house
» Return to Ordon Spring
- Walking in range of Rusl will alert him; which usually doesn't matter, but his pathing is RNG.
- Ordon Spring warp portal
- Enter Faron Twilight
Faron Province
Collect as many miscellaneous rupees as possible from now on. Rupee count in route will reflect minimum guaranteed. Don't worry too much if you fall behind, as backups will be mentioned.
- S. Faron warp portal
- Faron Vessel
» Kill first two bugs (leave tears)
- You can kill the two bugs with one **B attack** while holding forward, as long as you're close enough to the nearer bug.
- "B attacks" refer to the attacking animation wolf Link does when shaking the Wiimote. They don't involve pressing B, but are called that because that's how you do them on GCN.
- Bug outside Coro's house
- Bugs inside Coro's house
- Dig under gate, kill bugs, enter loading zone after bugs explode (leave tears)
- Tunnel
» Bugs on left wall (leave tears)
- You can jump attack the closer bug from a parallel angle to not bonk into the wall scaring the further bug.
- You can then charge attack the second bug and leave via Midna jumps.
- Bugs in tree trunk
- Ignore bugs that dig
- EMS
- Enter Sacred Grove
- Save on File 1 (Will be used for Early Boss Fights for early Deku Toad)
- You can save anytime before completing the Skull Kid fight.
- If you forget to save, backups will be mentioned later.
- Skull Kid chase 1
» Skull Kid fight 1
- You only have to kill one of the puppets, which starts the timer before be blows his horn.
» Master Sword puzzle (RD UUU LL DDD RU)
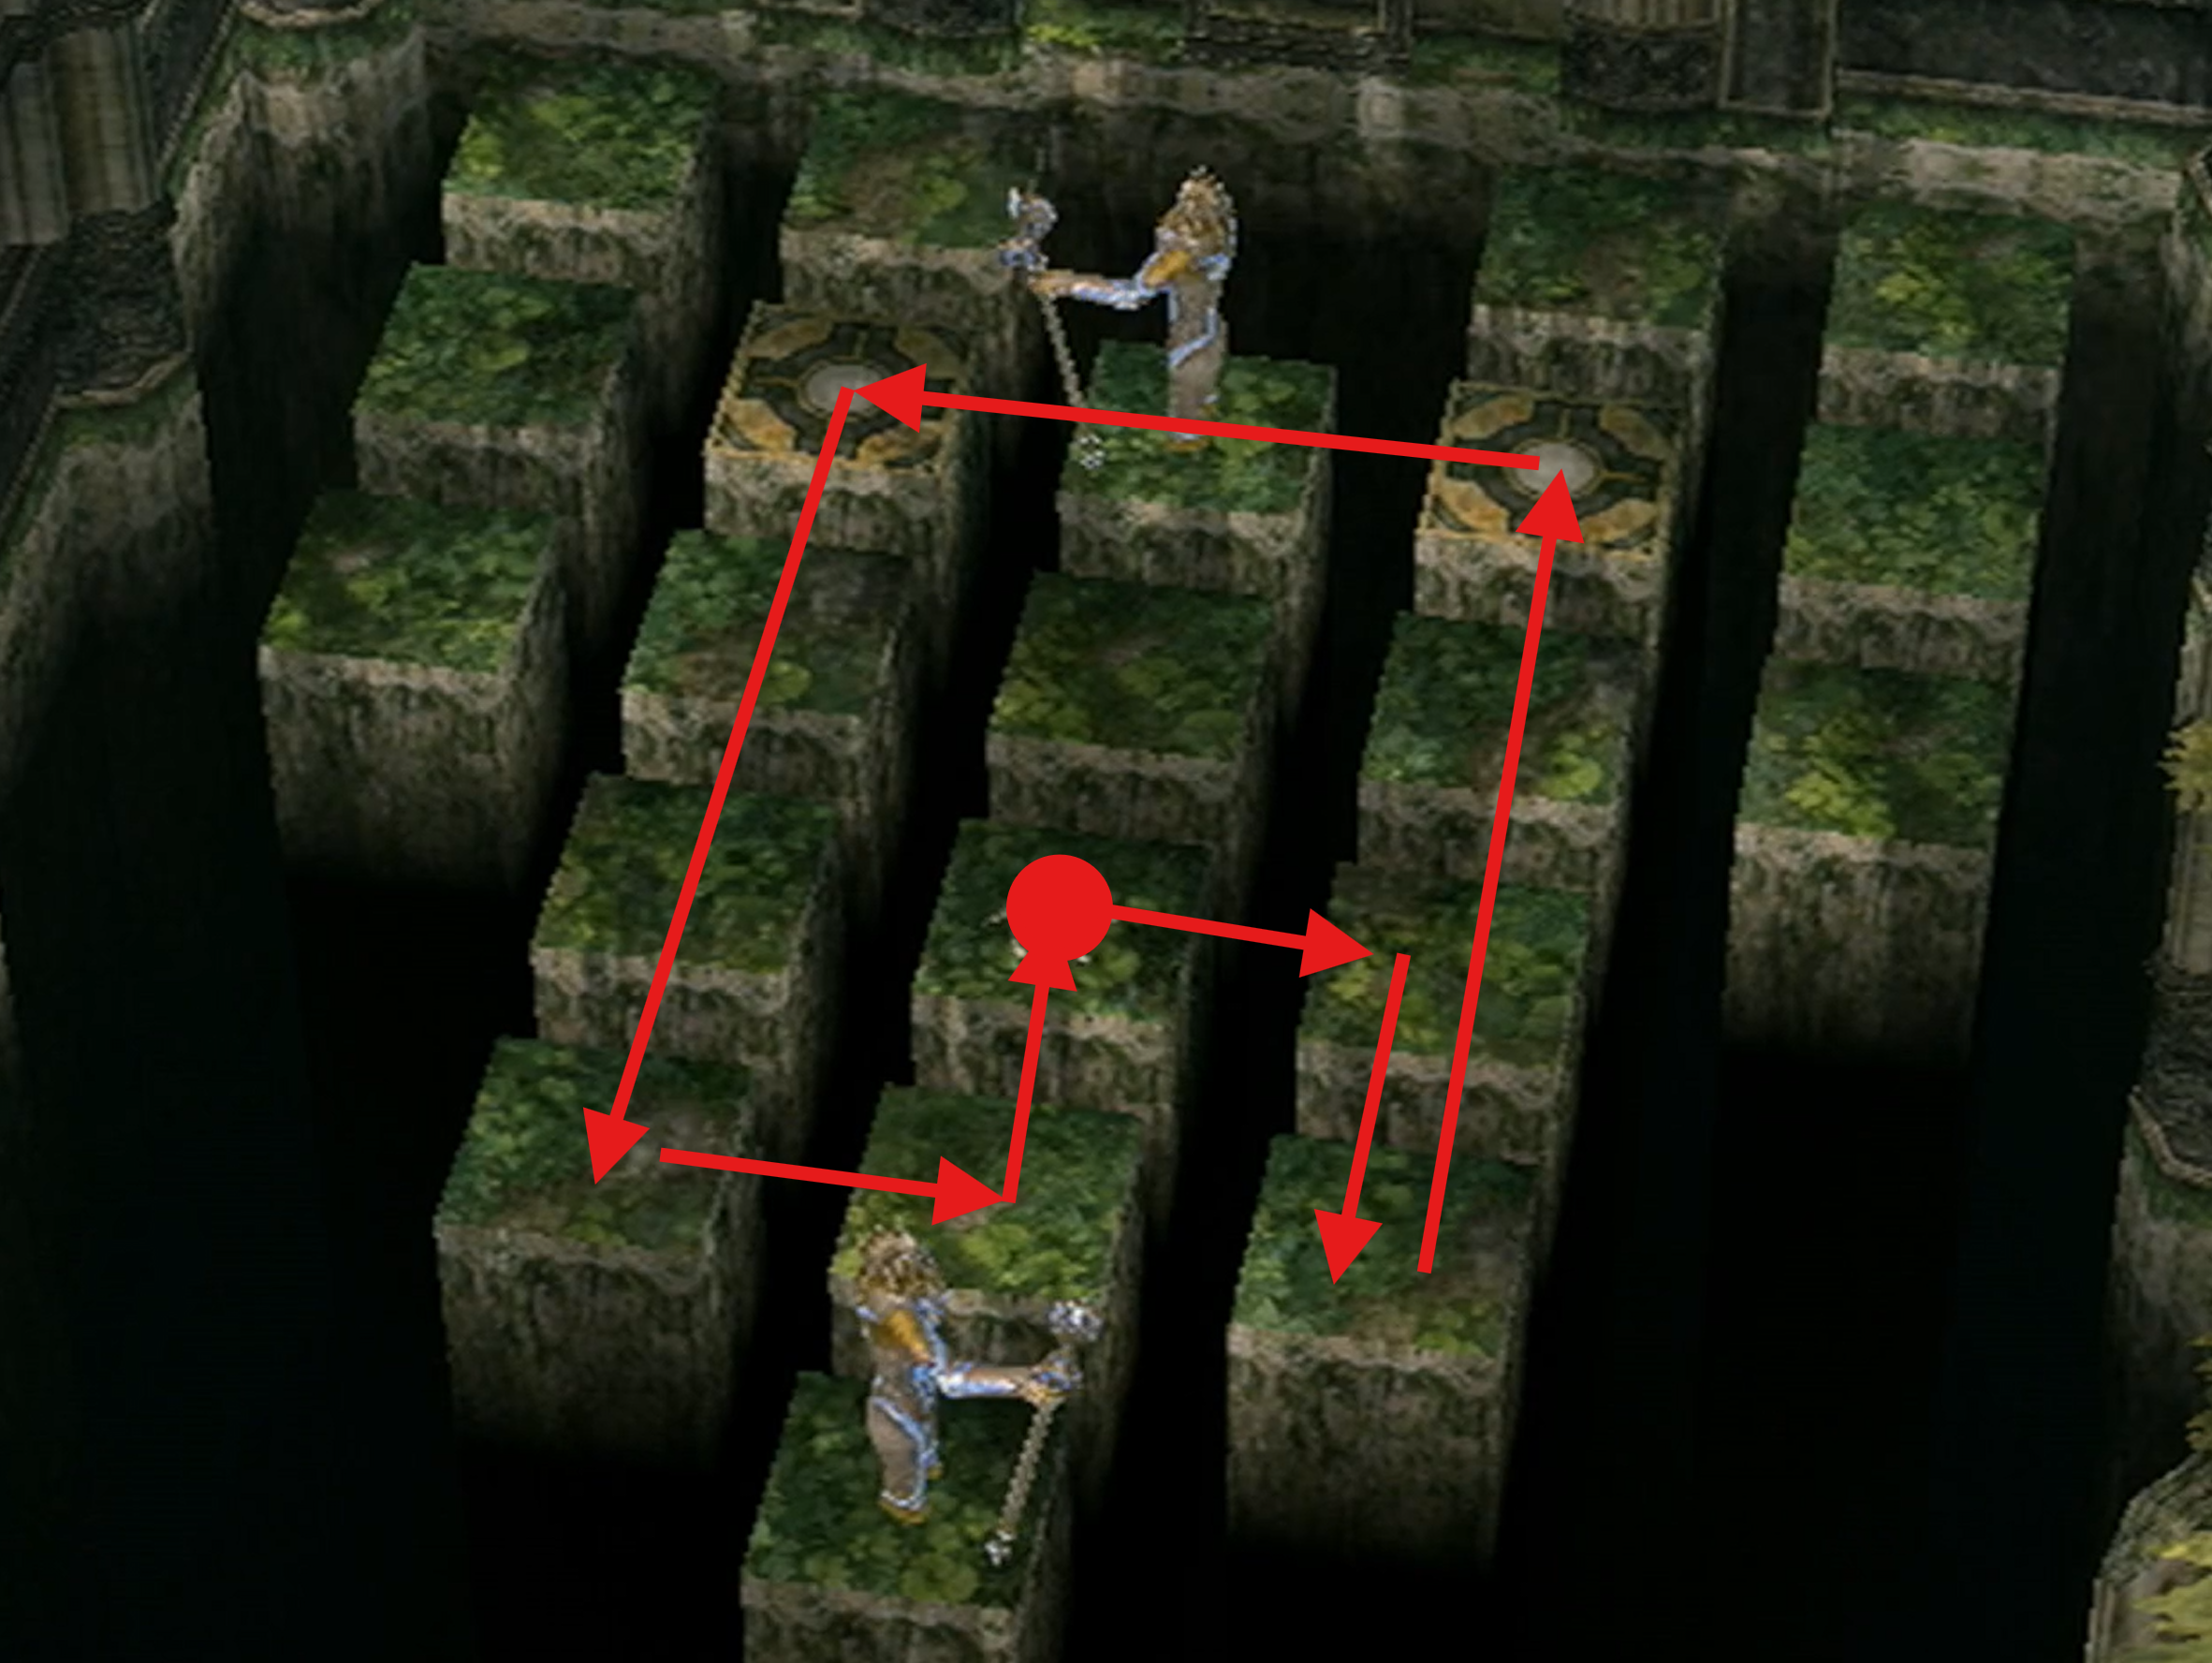
- Master Sword
- Warp S. Faron
- Collect missed tears on the way to the tunnel
- Collect missed tears in mist area
- Cross purple mist with lantern
» Transform and kill bugs before they dig
- Can kill both at once with an up+left directional B attack.
- While waiting for tears, dig behind sign and jump attack to collect a yellow rupee (11R+)
- N. Faron warp portal
- Kill last two bugs
- Turn senses off, transform, burn web, and collect tears
- Vessel complete
- Backflip to skip text (1-frame window)
- Warp N. Faron
- Ending Blow
- Enter Forest Temple
Forest Temple
- Spin cage + bokoblin (12R+)
- Kill walltulas with slingshot
- Enter main room
» Defeat skulltula and light torches
- Doing a rollstab + slash from the bottom of the stairs is the fastest way to kill it.
- Go outside, skip CS, go back
- After CS, 1 frame window to roll downwards to save a few frames
- Monkey swing to west door
- Burn webs, go outside and enter the room with the indoor bridge
- Small key chest, backtrack to west room
- Jump around skulltula and enter 2nd monkey room
- Save 2nd Monkey
- Back to center room
- Navigate to east door and burn web (it's faster to jump to the right to skip the first monkey swing)
- Up stairs, enter north door to go outside
- Early Gale Boomerang
- Ook and Gale Boomerang
- [Boomerang (B) / Lantern]
- Save “5th” monkey outside
- Break the cage near the next set of bridges to avoid Midna text trigger
- Deku Like Skip (Jump method OR Boomerang toss method)
- Enter door behind boulder
- Small key and light torches
- Open door with key (Saves “3rd” monkey)
- Head to Big Baba room (rang walltulas)
- Quick Major Deku Baba Fight
- Open door with key (Saves “4th” monkey)
- Go back through Center room
- Boss Key with fence hop
- Head north to monkey room
- Knock down walltulas with boomerang, climb vines
- Deku Like Skip #2 for small key
- Rescue 6th monkey with 1 bombling
- Rescue 7th monkey
- Rescue 8th monkey with tile worm boost
- Complete monkey chain, go to Diababa
- Diababa
- Skip Heart Container
- Exit Forest Temple
Eldin Transition
- Dash to Hyrule Field South (HFS)
- If on NA 1.0, Mailman skip
- Otherwise get the letter, transform back wolf then continue to the twilight gate
- Enter Eldin Twilight
- Kakariko Gorge Portal
- Warp S. Faron (forced warp to Faron)
- All future warps should be done via map warping, as it's faster than calling Midna to warp
- Dash to HFS and head northeast
- Lanayru Gate Clip
- Drop into Lake Hylia as wolf
- Kargarok fight
- Kargarok flight
- Be careful with aiming towards the middle of the screen
- Jump attack to skip text after CS (1-frame window)
» Ascend frozen waterfall
- On the 2nd Midna jump avoiding the falling icicle, hold Z and back after the jump to stay on the platform and not ledge grab.
- Zora’s Domain warp portal
- Warp to N. Faron, then warp bridge to Kakariko Gorge
- 1-frame jump attack or B-attack to skip Midna text after warp
- Enter Kakariko (KB1 trigger not present)
- Kakariko Village warp portal
Eldin Twilight
- Eldin Vessel
- Enter graveyard
- Kill graveyard bug (leave tear)
- Well Clip once bug explodes
- 3 basement bugs
- Graveyard bug tear
- Malo Mart bug
- First hotel bug
- Abandoned house bug
- Barnes' Shop bug
- Bomb house
- Or, Wolf Bomb House Skip (~40s faster)
- Watchtower bug (20R+)
- DMT bug
- Death Mountain warp portal
- 2 Death Mountain bugs
- Vessel complete
Lanayru Vessel
- Dash to Death Mountain Trail
- Midna jump to Goron and trigger cutscene
- Warp Kakariko Village after Goron yells and starts to roll at Link
- Renado talks to Link
- Tame Epona as wolf (first input is right)
- Alternatively, transform human (slower but less risky)
- Warp Death Mountain
- Warp rock to Zora's Domain as wolf
- Jump attack to skip text (1-frame window)
- Rutela cutscene (forced)
- Jump attack to skip text again (1-frame window)
» Swim down the river to Lake Hylia
- Hold forward, but only mash A to swim once surfaced. Once falling, equip boots to fall into the water below quicker.
Lanayru Twilight
- Lanayru Vessel
- Bug outside Lanayru spring
- Lake Hylia warp portal
- Stepping stones for bug
- Warp Zora's Domain
- Wall bug
- Exit to outer Zora's Domain on the left path
- Go to corner and drop to 2F
- 2F flying bug, jump into water
» Lilypad bugs
- On NA 1.0, bugs sink all the way to the ground before exploding if they are killed in the air and land in the water.
- It's mostly RNG in this case, but try your best here to either kill the bugs when they're underwater, or have them land and explode on a lilypad.
- Bug on cliff with RNG rupees in grass patches and boxes (24R+)
- Swim to Upper Zora's River (UZR)
- Listen to Iza for bug
- Down the river
- Dash to Castle Town
- Castle Town warp portal
- Dash cancel through Castle Town
- Castle Town bug
- Warp Lake Hylia
- Bug behind Fyer's hut (Keep it dry on NA 1.0)
- Howl at grass
- 4 Kargarok bugs, bonk, and press B to say 'No' to Midna
- Dock bug
- Boss Bug
- Vessel Complete
Getting the Zora Armor
- Warp Castle Town
- Mailman skip (NA 1.0 Only)
- Enter Castle Town as human
- Roll to Telma's Bar
- Start Telma Escort
- King Bulblin 2 Skip
- Continue to do full Telma Escort
- Collect RNG rupees from grass on Epona (40R+)
- Transform wolf after final gate
- Enter Kakariko Village
- Follow Rutela to Graveyard
- Zora Armor
Getting to Lakebed
- Warp Zora's Domain
- Run to Upper Zora's River
- Steal Lent Bomb Bag as wolf
- If you accidentally trigger the fight as human and are trapped, savewarp and roll forwards x3 to try again
- Do not need to talk to Iza at the end to fill the duped bag
- [Boomerang (B) / Boomerang / Boomerang / Boomerang] (automatic)
- Warp Ordon Spring
- Warp South Faron if you don't have Ordon Spring Portal
- Dash to Ordon Village
- Hit Bo trigger as human (wolf softlocks)
- Sumo for Iron Boots
- Warp Lake Hylia
- Dash down+right and go past the first bridge, then near the water, and transform human
» Equip Zora Armor and jump into the water
- Optimally, ZA is left on for the entire rest of the run, but note that this means 10 times damage from ice and fire.
- Feel free to take it off for Snowpeak Ruins and Argorok if desired (not necessary). You'll need it on again for Zant.
- Pillar Clip into Lakebed Temple with Zora Armor
- Save on File 2 and reset
- Load File 1 (Sacred Grove)
» [Set EBF](https://www.zeldaspeedruns.com/tp/tech/early-boss-fights#sacred-grove) and reset
- Howl at the stone and skip the cutscene. As long as the cutscene is skipped, you can reset (don't even need to wait for the fadeout after skipping).
- EBF here will be used for Deku Toad, who then restores the value to 0.
- EBF is maintained as long as the game is running, regardless of file selected. If the console is powered off, EBF will be lost.
- If EBF is lost or not set properly, don't worry, as a backup will be mentioned.
- Load File 2 (File # no longer matters)
Lakebed
- Equips will be reverted to pre-Iza: [Boomerang (B) / Lantern] (automatic)
- Pull lever
- Enter stalactite room
- [Bombs (B) / Iron Boots / Lantern / Boomerang]
- Drop stalactites with bomb + boomerang
- Out of bounds swim to west 2F
- Enter outer cog room 2F
- Drop stalactite with bomb + boomerang
- Climb vines and enter left door
- Ledge hang + JA to reach Deku Toad early
- Enter Deku Toad room from exit door, then look up to start the fight (EBF active)
- If EBF was lost somehow, clip through the gate
- 1-cycle Deku Toad
- If the sword combo is failed, feed Deku Toad a bomb before it can spawn tadpoles
- Clawshot
- [Clawshot (B) / Boomerang / Iron Boots / Bombs]
- Clawshot the switch and leave the room
- Backtrack to central staircase room (straight to cog room 1f, hallway, then across to staircase room)
- Clawshot over the vines to the left, and then drop to the bottom ledge
- Vine Clip with clawshot or bombs
- Morpheel with Zora Armor
- [Clawshot (B) / Boomerang / Lantern / Bombs] for final regrab
- Lantern to B on the way to the portal
- Heart Container
- Exit Lakebed Temple
Midna's Desperate Hour
- Transform wolf and dash to Castle Town
- Dash cancel through Castle Town
- Enter Telma's bar through the door and get kicked out
- Louise Glitch (saves about 1.7s, barely costs time to attempt)
- Push box once and dash jump to window
- Ropes in bar
- Poe
- Enter sewers
- Burn first web as wolf with the right stick
- Transform at second web and use Lantern
- Dig into hole
- Bulblin Archer
- Exit tower
- Early Wind Cycle
- Zelda cutscene
Desert Province
- Warp Lake Hylia
- Get Memo
- Swim to Fyer
- Boomerang red rupee from front of Fyer's cannon (60R+)
- [Auru's Memo (B) / Boomerang / Lantern / Clawshot]
- Show Memo to Fyer
- Enter Desert Province
- Transform wolf and dash northeast
» Steal a boar
- After the cutscene, dash towards the boars. Once near, transform human and spin attack them.
- Kill one or both of the riders, then mount a boar once it stands up and dash northeast.
- Boar through barricades
- Transform wolf and enter Bulblin Camp
» Clear Bulblin Camp
- Go around the back near the roasted meat, Midna charge the bulblin with the key, then enter through the center gate and transform human.
- There's a 50R chest next to said bulblin if needed.
- King Bulblin 3
- Boar through barricades
- Dismount, transform wolf, and enter Arbiter's Grounds
Arbiter's Grounds
This route skips the Poe Gate. If you don't want to do that, see Addenda.
If you collected a blue rupee and got the text at ANY point after entering Lakebed, then savewarp once you enter Arbiter's. Poe Gate Clip requires blue rupee text flag to not be set, which can be done if needed by returning to the title screen.
- B-attack across sand
- Transform human, clawshot then pull chain
- Small key
- Torch room
- [Boomerang (B) / Iron Boots / Clawshot] between lighting torch and door to automatically put lantern away
- Poe door cutscene
- Poe Gate Clip (65R+)
- [Boomerang (B) / Bombs / Clawshot] for the Boots force unequip
- Get blue rupee in the skull if needed (respawns on the way back)
- Boss key early
- Wolf through epic spinner room backwards
- Stalfos with bombs
- Or, skip killing the stalfos with 3pcc or step clip (comparison)
- 2R in pots in front of Death Sword's door if needed
- Enter Death Sword
- Death Sword
- Spinner
- [Spinner (B) / Boomerang / Bombs / Clawshot]
- Ride the spinner rail until the small valley is crossed, then roll to the entrance door
- Spinner to epic spinner room door
- Epic spinner room forwards
- Spinner to socket
- Enter boss room
- Stallord
- One-Cycle in phase 2
- Jump Attack into clockwise autospin
- Left slash, right slash, forward stab
- Repeat three times
- Heart Container
- Spinner out to exit Arbiter's Grounds
Getting to Snowpeak
- Mirror Chamber warp portal with a bomb
- Raise Mirror
- Warp Zora's Domain
- Enter Snowpeak
- Transform human and enter Ashei CS
- Ashei's Sketch
- Warp Kakariko Village
- Dash to Graveyard
- Back of Graveyard, through tunnel
- Transform human after exiting tunnel and swim across
- [Fishing Rod (B) / Ashei's Sketch / Bombs / Clawshot]
- Show sketch to Ralis for Coral Earring
- Go behind tombstone, warp Zora's Domain
- Dash to the lower shore on the right, transform human and fish for a reekfish
- Reekfish Scent
- Climb Snowpeak Mountain
- Dig hole
- Connection cave
- [Clawshot (B) / Bombs / Spinner / Iron Boots]
- Snowpeak Portal
- Talk to Yeto
- Only go on a spiritual adventure if you are spiritual ("yes" is the slower option)
- Snowboarding to Snowpeak Ruins (80R+)
- Grab pots before entering to refill health if needed
Snowpeak Ruins
This route does spinner bomb boost and freezard skip. See Addenda for alternate routes through SPR.
- Enter Snowpeak Ruins
- Yeta
- Yeto
- Block puzzle room
- Dig to courtyard
- Spinner Bomb Boost to other side of courtyard
- Freezard Skip
- Darkhammer 1-Cycle with bomb
- Ball & Chain
- [Ball & Chain (B) / Boomerang / Spinner / Iron Boots]
- Enter cheese room
- 100R from bubble (180R+)
- Savewarp
- 100R from armor in the lobby (280R+)
- Exit SPR through the door
Getting to City in the Sky
- Warp Kakariko
- Early City in the Sky
- Press Dpad Up to talk to Midna about cannon
- Press B to say 'No' to Midna
- Map warp to Lake Hylia
- Boomerang red rupee from front of Fyer's cannon (300R) if needed
- If you are short on rupees, Fyer has 60, and they come back every time you load the area
- [Clawshot (B) / Boomerang / Spinner / Iron Boots]
- Pay Fyer 300R to fix cannon
- Clawshot cannon to enter City in the Sky
City in the Sky
- Clawshot switch in first room
- Second room movement
- Fan Trigger Skip for early boss key
- See Addenda if you accidentally hit the trigger
- Exit via window on right
- Bridge
- Small Key
- Argorok Cutscene Skip
- If you fail this, remember to do fan trigger skip again after savewarping
- West Wing
- Get to Aeralfos early with 3pcc
- Aeralfos door clip or simply clawshot switch
- Aeralfos Skip
- Or, fight Aeralfos (much slower and not really easier)
- Double Clawshots
- Savewarp
- Sidehop twice on chest, jump attack, jump and autoroll and exit to outside
- [Clawshots (B) / Ball & Chain / Iron Boots / Boomerang]
» Return to main room via window
- The Argorok cutscene trigger is no longer there, so can go directly to the vines.
- Clawshot to 3F
- Clawshot through floor to boss key chest
- Boss Key
- Drop down
- Skip turning on fans
- Fan tower
- Enter boss door
- Skip cutscene to warp to top (NA 1.0 Only)
- Every other version, clawshot high up on vines
- Argorok
- Heart Container
- Put on Iron Boots and enter cannon to exit City in the Sky
Palace of Twilight
- Shake right away to jump attack and land on the bridge
- If you land in the water and are on NA 1.0, you can still warp away with boots on underwater
- Warp Mirror Chamber
- Enter Palace
- East room 1 with double hit
- East room 2 and jump attack from chest
- Phantom Zant 1
- East sol with Midna text skip
- East room 2 return
- Avoid squeebles by staying near railing after clawshotting sol
- East room 1 return
- Exit east wing
- Place sol 1
- West room 1 without hidden skills
- West room 2
- Phantom Zant 2
- West sol
- West room 2 return
- West room 1 return
- Light Sword with optimizations
- Enter north wing
- Sols in sockets
- Or, skip the staircase (~5s faster)
- Small key with faster platform spawn
- Boss key area
- Don't forget the boss key
- Early Platform room
- Early platform cycle itself is optional. If going for it, consider the Midna call strat linked above
- Kill the waves of shadow beasts
- Enter Zant
- Zant with Zora Armor
- Skip Heart Container
- Exit Palace of Twilight
- [Bombs (B) / Ball & Chain / Iron Boots / Clawshots]
Hyrule Castle
- Warp Castle Town
- Mailman skip (NA 1.0 Only)
- Squidna CS
- Enter Hyrule Castle
- Barrier 1 with bomb
- Skip Barrier 2
- King Bulblin 4
- [Iron Boots (B) / Ball & Chain / Bombs / Clawshots]
- Midna text skip
- Hold Z, down on the stick, mash A+B alternating, and softly mash start
- If failed, either savewarp or backtrack (~0.3 faster than saving over used file)
- Enter Castle (Clawshots to B before opening door)
- Barrier 3 Skip
- If failed, savewarp (or simply reload save if you already saved after KB4)
- Clawshot to second floor
- Darknut
- [Clawshots / Bombs / Boomerang (B) / Lantern]
- Enter puzzle room (right door)
- Torch puzzle
- Dynalfos with bomb
- Aeralfos
- [Clawshots / Bombs / Ball & Chain (B) / Spinner]
- Small Key
- Boss Key
- Enter tower
- Block room shortcut
- Second lizalfos fight
- Spinner up
- Skip final darknut
- Enter final battle
- Ganondorf
Congrats!
Addenda
Version Considerations
This route was designed to be possible on every version of TP Wii. See this page for version differences. Some additional notes:
-
The fastest version for this route is NA 1.0, due to mailman skips being possible and broken cutscene skips in CitS
-
With PAL Wii and NA 1.2, you can skip getting rupees altogether with the language set to French, which may save a few seconds
-
The route works the same on the Wii U's vWii. Loading times are practically identical. The only difference is that since there's no console reset button, you must reset from pressing the home menu button on the Wiimote, which is slightly slower, and can make Back in Time more precise
Arbiter's Grounds
Here's the route without PGC (or poe 1 skip):
-
Pull Chain
-
Small Key
-
Poe #1
-
Poe Scent
-
Pull chain + enter B1 door
-
SK chest
-
Poe #2
-
Back to main room
-
Chandelier 1 with pull cancels (can let go before the pull animation finishes)
-
SK by redead
-
Redeads outside Poe #3 (80R)
-
Poe #3
-
Rat room (small key)
-
Chandelier 2
-
Triple stalfos with bombs
-
Poe #4
-
Back to main room
-
Through poe gate
-
Early boss key
-
Stalfos with bombs timesaver
-
Death Sword
-
Spinner
- [Spinner (B) / Boomerang / Bombs / Clawshot]
-
Savewarp
-
Backtrack through the dungeon
-
Spinner socket in boss key room
-
Routes merge
Snowpeak Ruins
-
If you don't want to do spinner bomb boost you can go to 2F (about 60s slower than spinner boost):
- Grab the small key in the courtyard
- Do bomb boost to 2F
- Head to the ice floor room
- Through the locked door, to double freezards in the next room
- Freezard Clip on 2F
- Go through the door, and then drop on the other side of the courtyard.
-
If you prefer not to do bomb boosts in any capacity, then do the following to get the pumpkin:
- After digging to courtyard, open the small key chest
- Go to locked door on 1F and defeat the freezards
- Go to next room and defeat double Chilfos
- Ordon Pumpkin
- Go back and talk to Yeto
- Talk to Yeta (unlocks access to East courtyard)
- Proceed to other side of courtyard and continue with route as written
-
If you don't want to do freezard skip, killing the freezard with the cannon isn't too much slower:
- Turn cannon towards freezard
- Dig other small key chest
- Unlock door, transfer cannonball to courtyard
- Fire cannon to kill freezard
City in the Sky
-
If you fail Argorok Cutscene Skip (bridge), don't forget to skip the Fan Activation trigger again after the Double Clawshots savewarp.
-
If you failed Fan Activation Skip, you will have to go through the second half of the dungeon normally. From the small key room:
- Clawshot around a lot
- Crystal Switch snipe
- Reach the other door in the room
- Next room:
- Defeat the baba head (ignore the base)
- Clawshot up the tower
- If a pillar falls and you fall below it, you will have to reload the room.
- Out in the gardens
- Cross the peahats over and then back to the door not near a chest
- Clawshot across to the center of the dungeon from there via peahats
- You're in the 3rd floor room mentioned above now.