
No Save & Quit (Bombs) (PAL)
A memory card is not needed to run this route.
This route is intended for the NTSC-U or PAL Gamecube release of the game, which is slower than the JP route, but omits the difficult Wolfos Superjump. For the JP route, click here. Because having blue rupee text available in Arbiter's Grounds is necessary for Poe Gate Clip, playing on French (PAL) is recommended: no rupees are needed for Fyer on French, so it's easier to avoid accidentally getting blue rupee text earlier in the run because blue rupees themselves can be ignored.
This route is approximately 15 seconds faster than the no bombs route, but adds various difficult tricks (Deku Toad Early Bomb, Death Sword Skip, and Stallord Skip)
Ordon
- Faron Gate Clip
- Lantern (2R)
- Small Key Cave
- Save Talo
- Bokoblins Break Cage
- Bokoblin Pushing
- Goats
- Castle Sewers (3R)
- Castle Rooftops
- Sword & Shield Skip (6R)
Faron Province
- South Faron warp portal
- Faron Vessel
- Kill first two bugs (leave tears)
- Bug on Coro's house
- Bugs inside Coro's house
- Dig under gate, kill bugs, enter loading zone after sound effect (leave tears)
- Tunnel
- Bugs on right wall (leave tears)
- Bugs in tree trunk
- Ignore bugs that dig
- EMS
- Skull Kid chase 1
- Skull Kid fight 1 (8R+)
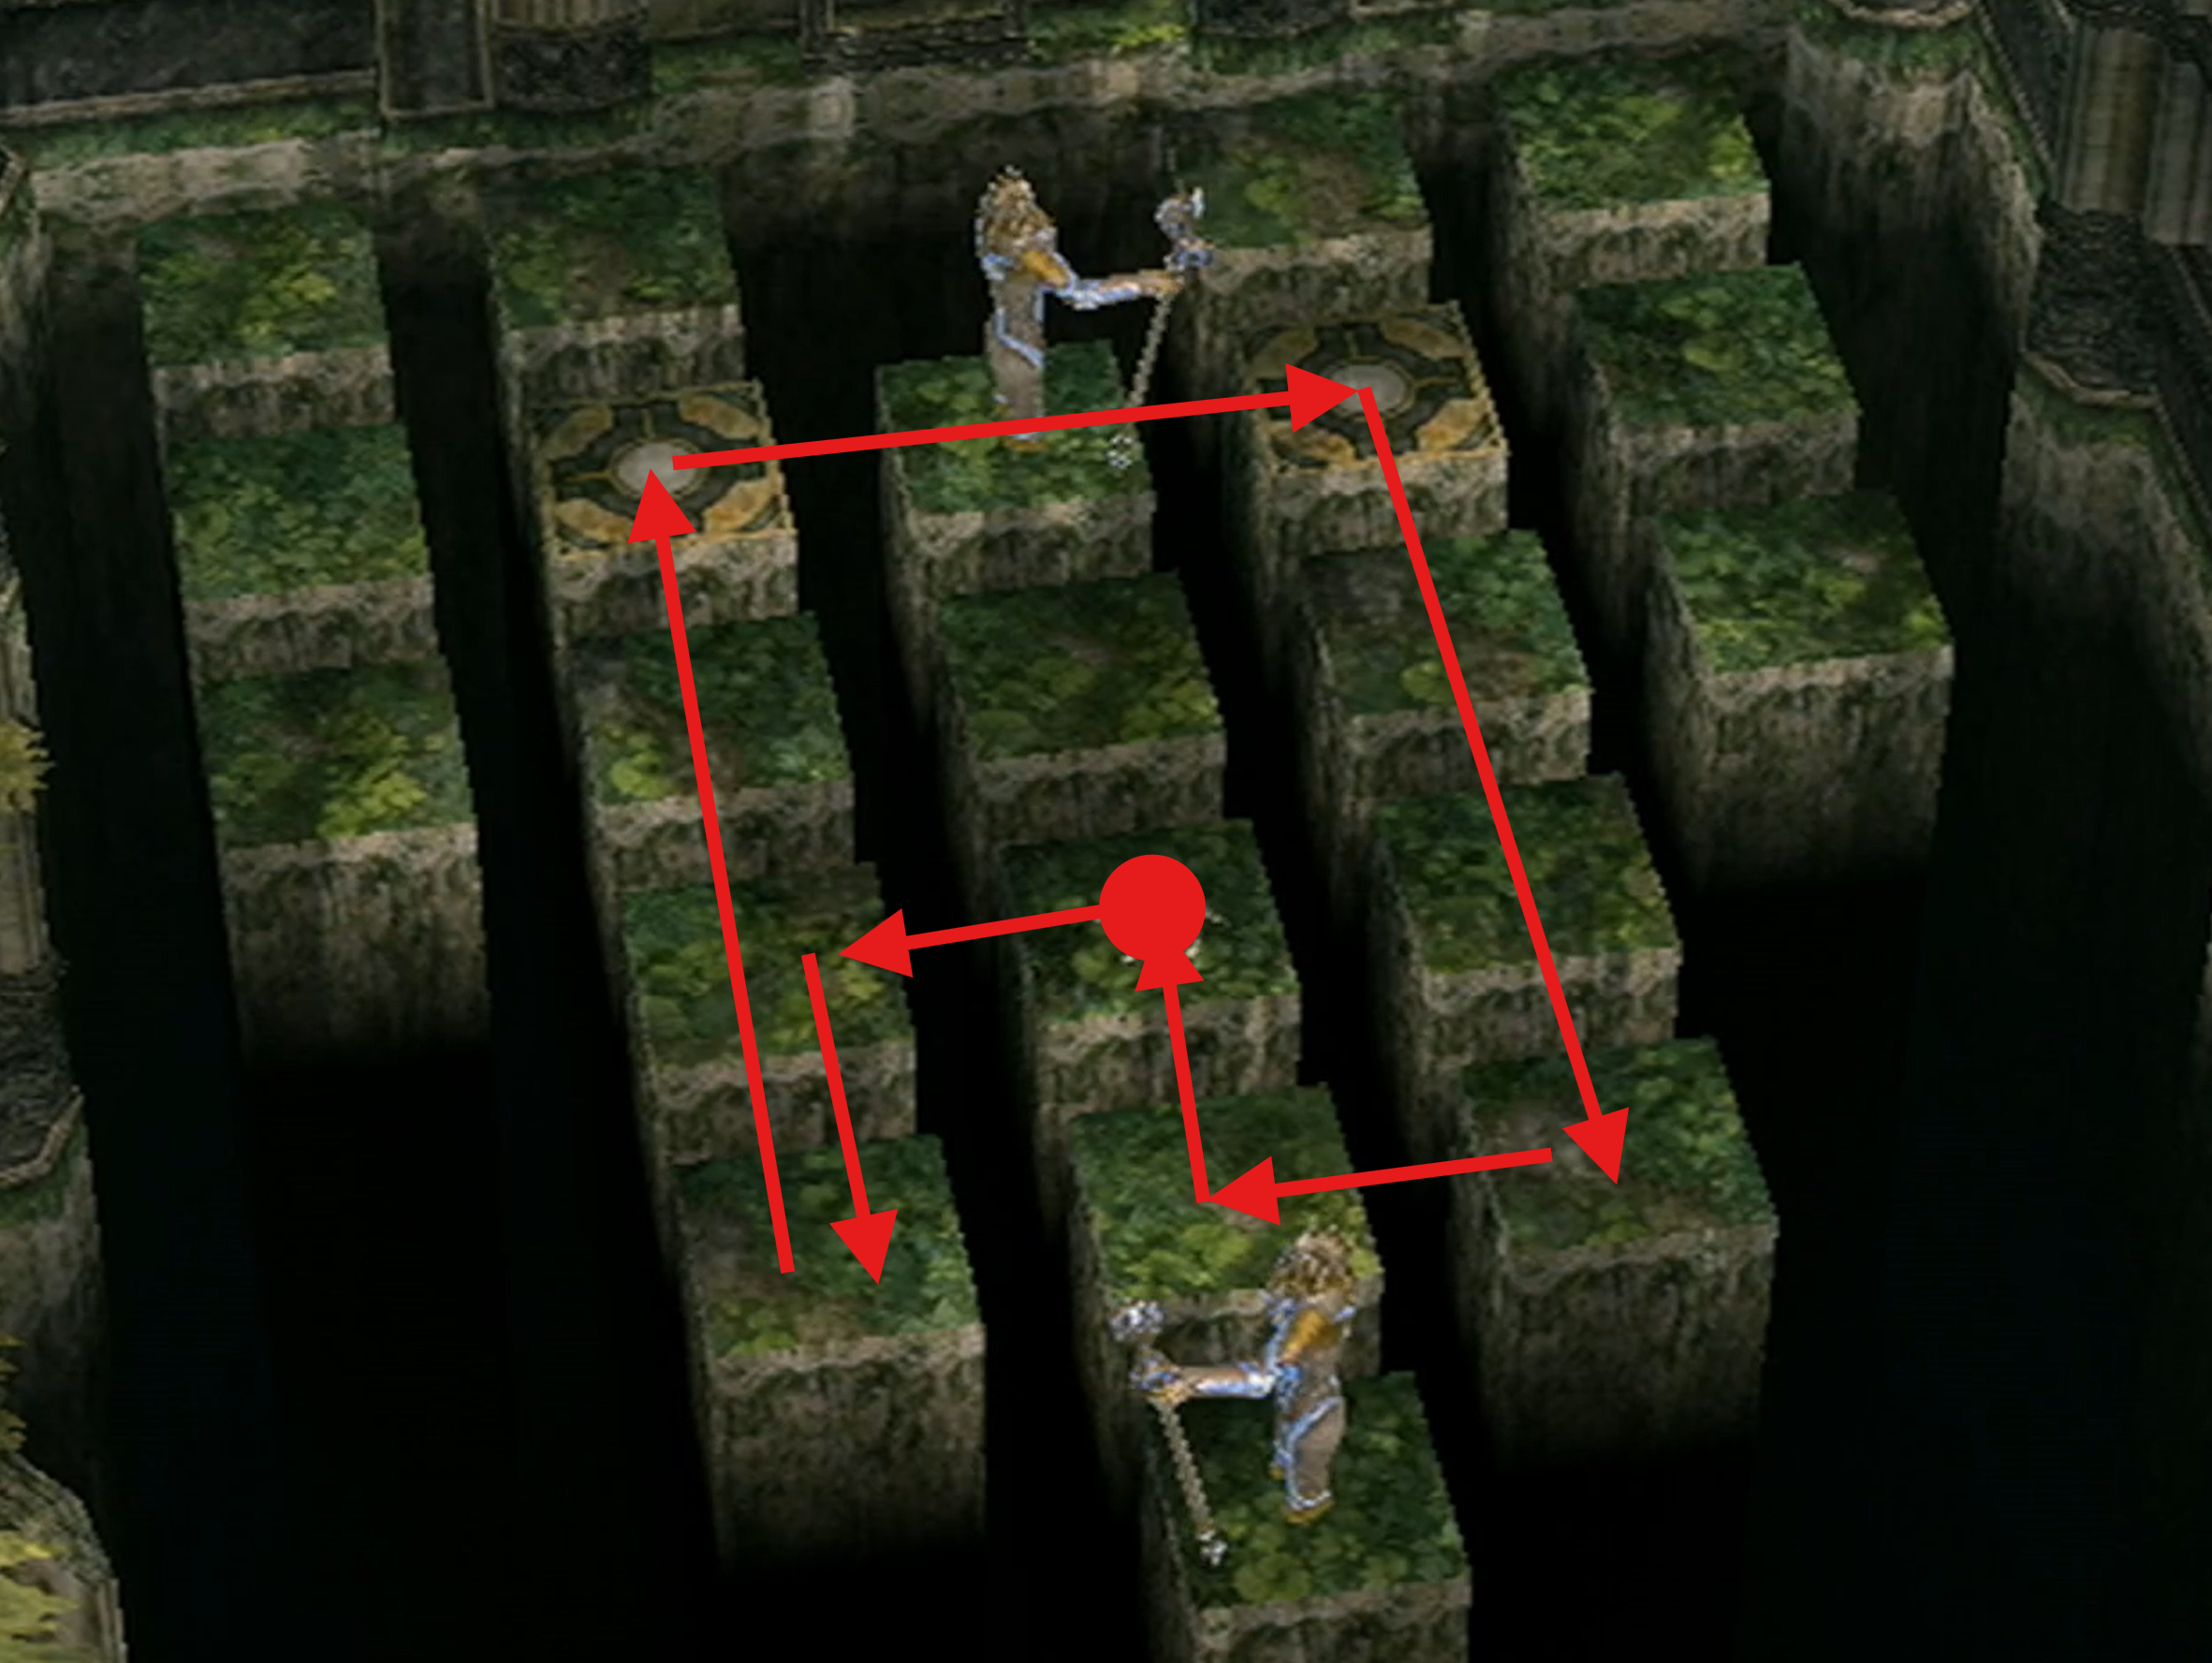
» Master Sword puzzle (LD UUU RR DDD LU)
- Warp South Faron
- Collect missed tears
- Enter the purple mist area and grab two tears
- Cross purple mist with lantern
- Transform and kill bugs before they dig
- While waiting for tears, dig behind sign and jump attack to collect a yellow rupee (18R+)
- Only get this rupee if confident in skipping the text, as yellow rupee text is ideal for rupee roll
- North Faron warp portal
- Kill last two bugs
- Enter Forest Temple
Forest Temple
- Kill Spiders With Deku Baba Nuts (or Wolf) (19R)
- Light Torches + Go Outside
- Back To Torch Room and Enter East Door
- Blow Up Rocks With Bombling
- Ooccoo from pot
- Over Platforms and Outside
- Small Key Chest
- Save 2nd Monkey
- Get rupees if dropped by bokoblins
- Back to Torch Room + Enter West Door
- Early Boomerang
- Ook
- Gale Boomerang
- Ooccoo Out
Getting to Eldin Vessel
- Collect Last Two Tears
- Vessel completed
- 1 frame Backflip for text skip
- Faron Escape
- Dash to Eldin
- Postman Skip
- Enter Eldin Province
- Kill Gorge Messengers
- Gorge Void
- Gorge Skip (29R)
- If you fail Gorge Skip and get the yellow text, it can be backed up with an RNG blue rupee, but that it impossible to do Poe Gate Clip later
- Enter Kakariko (no Bulblin trigger on the ground)
- Get Kakariko Warp Portal
- Leave Kakariko
- Forced Warp to North Faron
- Dash to Golden Wolf
- Ending Blow
- Warp Kakariko Village
- Eldin Vessel
Eldin Province
- Enter graveyard
- Kill graveyard bug (leave tear)
- Well Clip once bug explodes
- 3 basement bugs
- Graveyard bug tear
- Malo Mart bug
- 2 hotel bugs
- 10R behind cabinet (don't need to skip text) (39R)
- Abandoned house bug (41R)
- Barnes' Shop bug
- Bomb House Skip, collect 3 tears
- Watchtower bug (47R+)
- DMT bug
- Death Mountain warp portal
- 2 Death Mountain bugs
- Vessel complete
- Dash To DMT
- Hit Goron Trigger
- Warp Kakariko
- Tame Epona
- Warp South Faron
- Dash to Ordon
- Get Orange Rupee behind Rusl's house with boomerang (147R+)
- Enter Bo's House
- Iron Boots
Lanayru Province
- Exit Bo's House
- Warp South Faron
- Faron Escape
- Dash to Lanayru
- Lanayru Gate Clip
- Enter Lake Hylia
- Kargarok Skip with Iron Boots
- [Boots /Lantern]
- Faster Kargarok Flight
- Zora's Domain Warp Portal
- Warp Death Mountain
- Transform in the corner
- Warp rock to Zora's Domain as human
- Rutela Skip
- Lanayru Vessel
- Bug outside Lanayru spring
- Lake Hylia warp portal
- Stepping stones for bug (149R+)
- Warp Zora's Domain
- Wall bug and Rutela Skip
- Waterfall Sidehop or drop down right wall to bug (152R+)
- If you fail waterfall sidehop by falling to the lower level, use Midna jumps to climb back up
- Do not savewarp if you fall all the way down
- 2 lilypad bugs
- Bug on cliff (RNG rupees in grass) (157R+)
- Listen to Iza for bug (160R+)
- Down the river
- Castle Town warp portal
- Dash cancel through Castle Town
- Castle Town bug
- Warp Lake Hylia
- Bug behind Fyer's house
- Howl at grass
- 4 Kargarok bugs, bonk, and press B to say 'No' to Midna
- Last small bug
- Boss Bug
- Vessel complete
Zora Armor
- Warp Zora's Domain
- Jump down Zora's Domain to get both yellow rupees without taking damage (180R+)
- Dash to Upper Zora's River
- Fight messengers as wolf to receive lent bag from Iza
- Warp Upper Zora's River for the permanent bomb bag
- If you plan to use the Epona bomb boost during the wagon escort, skip warping to UZR here and do it after getting Zora Armor instead so that you have bombs in the bomb bag during the wagon escort
- Postman Skip
- Enter Telma's Bar (Starts Wagon Escort)
- Bulblin 2 Skip
- Collect rupees from grass during escort (200R+ ideally)
- Wait for wagon to catch fire and use Boomerang
- Open gate and wait for wagon to go through
- Kill all three Boar Riders
- Kill Kargarok (With Boomerang)
- Dash to Gorge Skip area (If done right the Bulblins won't respawn, so you can leave the wagon behind)
- Epona slide over the gorge
- The Epona slide is the fastest method of crossing the gorge, but it is frame perfect and falling into the gorge costs around 2 minutes
- For safer methods, see the Epona bomb boost (costs ~20s) and Epona backhop (slower)
- Dig under Kakariko Gate
- LJA over Midna Trigger
- Follow Zora Queen to Graveyard
- Zora Armor
- If you didn't already warp back to Upper Zora's River to get the permanent bomb bag, do so now
Lakebed Temple
- Warp Lake Hylia
- Equip Zora Armor and swim to Lakebed
- Pillar Clip
- If you have 190-199R, collect the yellow rupee atop the broken pillar on the way to pillar clip (costs ~1.5s)
- Swim to end of tunnel
- Open water bomb chest (10WB)
- Skip Stalactites
- Swim out of bounds to 1f east hall
- Enter door ahead of you
- Head to Deku Toad
- Clip under gate to Deku Toad
- 0 Cycle with Master Sword, Boomerang, and a bomb (5 slashes + Water Bomb) (7WB)
- Clawshot
- Back to main room
- Boss Key Skip (switch drop method)
- Morpheel
- Heart Container
- Bomb bag fills with 30B on leaving the dungeon
- Equips revert to [Boots / Lantern] automatically
Midna's Desperate Hour
- Transform Wolf
- Dash to Castle Town
- Enter Telma's Bar through the door
- Push box once and dash jump to window
- Ropes in bar or rope skip
- Poe
- Enter Sewers
- Burn first web as wolf with stick
- Transform at second web and use Lantern
- Dig into hole
- Bulblin Archer
- Exit Tower
- Early Wind Cycle
- Zelda Cutscene
Getting to Snowpeak Ruins
- Warp Zora's Domain and exit on land
- Jump down without taking damage
- If you have 195-199R and have already gotten blue rupee text, can get the blue rupee on the way down to reach 200R+
- Dash to Peak Province
- Map Glitch
- [Snowpeak Howling Stone ¯–_–––_¯–_(only howl once, then leave)](https://www.zeldaspeedruns.com/tp/knowledge/general-tips#howling-stone-songs
- [Clawshot /Boomerang]
- Messenger Skip
- Snowboarding (Blind because fog remains)
- Enter Snowpeak Ruins (Fill up on hearts from pots)
Snowpeak Ruins
- Enter door on the left
- Early Heart Piece 2 (Don't need the Heart Piece)
- Clawshot through the ceiling
- Floor Clip
- Open door and push block
- Clip under door
- Freezard Skip
- Darkhammer 1-Cycle with bomb (towards courtyard)
- Ball & Chain
- Exit to Courtyard (Leave ZA on for 2.5 hearts damage)
- Enter Lobby
- Get Orange Rupee in the armor (300R)
- If under 300R, get red rupee from Fyer's cannon before desert or City in the Sky, or get red rupee from redead in Arbiter's Grounds if not skipping poe gate
- Leave Snowpeak
- Grab 1 heart from pot
Desert Province
- Warp Lake Hylia
- Get Auru's Memo
- Dash Down to Cannon
- Show Memo and go to Desert Province
- Enter Bulblin Camp without a Boar
- Map Glitch to King Bulblin
- Enter Arbiter's Grounds as Human
Arbiter's Grounds
- Human entrance
- Pull chain
- Small Key
- Poe gate clip
- Boss key early (autoroll method)
- If traversing next room as human, get boss key now; if using wolf, get boss key on the way to Stallord
- Full human movement after boss key
- or stay wolf (roughly 2s slower)
- Triple Stalfos Skip
- Get 2R in pots in front of Death Sword's door if needed
- Enter Death Sword
- Death Sword Skip
- Spinner
- Place bomb and slash to deathwarp
- Spinner to door
- Epic spinner room
- Open boss key chest if you didn't already
- Enter Stallord
- Stallord Skip
- Exit Arbiter's Grounds
City In The Sky
- Mirror Chamber Warp Portal
- Warp Kakariko
- Early City in the Sky
- Fix Cannon
- If you are short on rupees, Fyer has 60
- Enter City in the Sky
- LJAs Over First Room
- Transform Wolf
- Approach and open door very slowly to skip the trigger
- Exit Window on Left
- Bridge
- Small Key
- Argorok Cutscene Skip
- Enter East Wing
- Gate clip
- Aeralfos door clip
- Aeralfos
- Aeralfos Skip is possible but risky, as the Aeralfos has to kill you through the gate.
- Double Clawshots
- Leave room
- Clawshot around walls
- Clawshot pull switch and enter door
- Clawshot across
- Stand on the very edge
- Boomerang first Deku Baba down
- Clawshot as far back as you can
- Clawshot down furthest Deku Baba
- Clawshot to furthest netting (You can skip one)
- Early Boss Key
- Enter Boss Key Room
- Boss Key
- Drop down
- Skip Turning on Fans
- Fan Tower
- Enter Argorok
- Clawshot vines with optimization
- Argorok
- Equip Boots and enter cannon to exit
Palace of Twilight
- Mash B to jump-attack and land on the bridge
- Warp Mirror Chamber
- Enter Palace of Twilight
- West Wing
- Phantom Zant 1
- Skip Midna Sol Text
- Staircase Timesaver 1
- Exit West Wing
- Place Sol 1
- LJA to East Wing
- LJA after Small Key
- Phantom Zant 2
- Staircase Timesaver 2
- Place Sol 2
- Master Sword 2.0V
- Enter North Wing
- Place Sols
- Out of Bounds LJA
- Small Key with faster platform spawn
- Out of Bounds LJA to door
- Boss Key Shortcut
- Platform to Zant Head
- Void Out
- Zant Heads
- Small Key
- Early Platform
- LJA after Early Platform
- Enter Zant
- Zant
- Enter portal
- Exit Palace of Twilight
Hyrule Castle
- Warp Castle Town
- Postman Skip
- Squidna Cutscene
- Enter Hyrule Castle
- Barrier 1 with Bomb
- Skip Barrier 2
- King Bulblin 4
- Avoid walking into Barrier 2 on the way back
- Enter Castle
- Barrier 3 Skip
- Darknut Room
» Torch puzzle (NE, NW, SW, SE)

- Dynalfos with bomb
- Aeralfos
- Small Key
- Boss Key
- Enter Tower
- Block Room Shortcut
- Skip final Darknut
- Enter Final Battle
- Ganondorf