
Deku Tree
See Gohma for the boss fight in Deku Tree.
──── Entering Deku Tree ────
As Child, the Deku Tree is almost always free to enter. However, getting past Mido usually requires Kokiri Sword and Deku Shield. See Kokiri Forest § Mido Skip for the trick that bypasses Mido.
As Adult, Deku Tree's mouth is closed and glitches are required to enter the loading zone, which still exists behind the closed mouth.
House of Twins megajump
Usually considered a fairly beginner-friendly strat.
You can climb up on the House of Twins (the building with the Gold Skulltula as Adult, across from the shop) and do a megajump with Hover Boots and a Bomb or Bombchu. This gets you onto the seam above the Mido hallway, and you can bypass the load trigger for the next room allowing you to simply walk into where the Deku Tree's mouth would be. There are two main setups for the jump, which differ only slightly, but most of the trick is essentially the same either way.
HESS clip
For most routes that enter Deku as Adult, the fastest method is using the speed from a HESS to clip through the Deku Tree's roots with hover boots and redirect the momentum towards the loading zone. Note that the starting angle for the HESS is important (see video, although there are other ways to get the angle too) to get the clip. Video shows the trick with a Deku Stick but this can be done with sword or hammer as well.
Mustache clip (No Hover Boots)
If you don't have hover boots, the standard strat to enter Deku is called "Mustache Clip", which uses a position high on the Deku Tree's roots to clip into the loading zone. This can even be done with no items (see the second video below). Note that this is made a bit more annoying if you have not beaten Forest Temple yet, as the Kokiri Forest enemies will all be present.
The normal strat uses a bomb and shield. See the first video below:
- Target wall at the end of the hallway (angle 0x8000) and turn left
- Sidehop right until the corner (as shown)
- Roll into the corner, then sidehop left and sidehop right
- Backwalk up the slope
-
Sidehop right on one of 9 working frames
A good visual cue is C-down passing the top of the top of the grass on the seam in the distance, click to reveal image
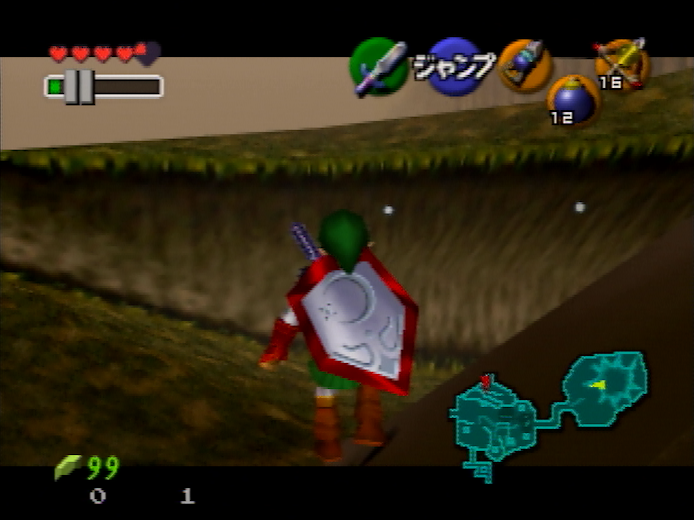
- Continue backwalking, Link will slide down, continue backwalking until his back is against the wall
- Turn 180 degrees and target
- 1ess turn left
- Walk forward until yellow on bottom of Hylian Shield isn't visible (Mirror Shield will look different)
- Turn 180 degrees
- With bomb: Place bomb down, hold R to crouch
- With bombchu: Pull chu and start holding R to crouch on 8th red flash
Child Bombchu hover
Useful for the LACS Wrong Warp setup and fast in some other niche scenarios.
──── Upper Floors ────
For strats that skip Basement 1 from the upper floors, see B1 skip. For strats that enter Gohma's room directly from the upper floors, see 2-3-1 / Enter Boss Room.
Navi text skips
Navi normally has forced textboxes in front of many of the vines and doors in Deku, all of which are skippable.
There are two vines that runners usually need to climb, but which have forced Navi text triggers if the player has not already read the Navi text (meaning if you read the text at the first vines, there won't be text at the second vines).
The doors to the Slingshot chest room and the Compass chest room work similarly, although it is rarer for runs to go to these rooms (usually only in 100% and Bingo).
Vine Text Skips
As Child
The first vine text can be skipped in two main ways: pulling out a stick/switching weapons while walking through the trigger (not allowed in Glitchless AMQ) or doing a very precise roll through the trigger. The Navi trigger here is a semi-circle connecting one edge of the vine wall to the other, meaning the trigger is much smaller at the edges than towards the center.
The easiest method is to pull a stick at about the same time you reach the vines, and Navi will not talk since Link is in a "busy" state of pulling out an item, although this method is not allowed in the Glitchless AMQ ruleset. The same trick can be done with sword, but it is more precise; you will want to aim for the edge of the vines (as explained above) and pull sword later than you would pull stick, when Link is very close to the wall. The most difficult method is with a roll, aimed at the edge of the vine wall, and spaced perfectly such that the roll ends just as Link reaches the vines. This is highly precise and it's virtually impossible to get consistently; it's often attempted in Glitchless AMQ but usually fails.
Skipping the text on the second vines is simple: the text triggers on the ground near the vines, so just backflip onto the chest containing the Map, then jump to the vines to grab them mid-air. The method of pulling a weapon while walking through the trigger does work here as well.
As Adult
Adult Link usually has access to the Hookshot, so you can simply hookshot high up on the vines before reaching the point on the ground where the text will trigger. However, most Adult Deku routes will hookshot straight to the upper floor vines then walk towards the Slingshot room door to do 2-3-1 skip. This does force Link to walk through the Navi trigger. It can be skipped by unequipping the Hookshot (so it is no longer on any C buttons), forcing Link to put it away when landing, allowing you to walk through the trigger while in a busy state.
Door Text Skips
The text skips for the two doors are simple; you can sidehop in front of the door then press A on the frame Link lands. This will open the door without Navi talking, as Child or Adult.
When exiting the Slingshot rooms or the Compass room, be sure to stand fully against the door so that Link moves fully past the text trigger when walking out.
Skipping the first web
Normally the web on the ground floor requires you to jump from the top floor to break it and access the basement. This can be bypassed in a few ways, either by burning the web or using glitches to get underneath it to the basement.
Burn Web with Glitched Damage
By getting glitched damage, usually by getting quick putaway, a crouch stab will burn the web without requiring a fire source. This is the fastest way to break the web and/or get to the basement as Child, still used in No Wrong Warp (No SRM).
Hookshot Ladder Clip to Basement (Adult)
Position yourself at a slight angle from the ladder to the left of the Deku Tree entrance and hookshot the side further from Link near the top. When done correctly, Link should grab the edge of the platform instead of the ladder. Once hanging from the edge, simply press A to let go and then press B to jumpslash. Once you land in the unloaded Basement 1, you can climb up the vines about halfway until you reach the loading area for Basement 1 and then drop down again.
Itemless Ladder Clip to Basement (Adult)
Weirdshot through Web (Adult)
You can simply perform a weirdshot near the first web and then hookshot the vines to get underneath the web. (Video)
Slingshot room timesaver
When entering the room with the Slingshot chest, jump down to the ground without triggering the middle platform, and climb up the vines. After getting the Slingshot, just jump back across to the door using the crumbling platform.
If for some reason you use the platform and are shooting the ladder down, note that you can move Link during that cutscene where the ladder falls.
Kill B1 Skulltula from first floor
After entering Deku Tree if you have bombchus, going straight forward until almost at the edge of the hole then shield dropping a bombchu will kill the Gold Skulltula on the grate in B1, assuming you jump down to load the skull. The video shows this as well as a strat to kill the vine Skulltula with a bomb while falling.
──── B1 Skip ────
It is possible to skip the first basement floor (B1) in a number of ways. Note that this only covers strats as Child Link, because Adult can easily climb or jump to the ledge where the second web is in the basement. For strats that skip both B1 and the 2-3-1 scrubs, see 2-3-1 / Enter Boss Room
Jumpslash recoil (Anti-gravity)
Usually, the fastest methods of B1 Skip use a jumpslash recoil after breaking the ground floor web. There are three common methods for doing this, two of which are glitchless from the top floor and one of which uses a hover halfway up the vines. The basic idea is to jump onto the web to break it, then sidehop immediately when Link is still standing on the web (or standing in mid-air due to ISG), and jumpslash with proper timing.
No matter which method you do, if you successfully do the anti-grav unbuffered you can immediately clip through the web, but in Glitchless (both rulesets) that is banned, and in if you're using Gohma Double K.O. you will want to burn the web anyway to get through on the second trip. If you pause to buffer the anti-grav jumpslash, the web will properly load and you will have to burn it no matter what.
Sockfolder's Setup
The easiest and most longstanding variation on this B1 skip uses a setup by sockfolder. His video is shown below, and some details from the video description are good to note:
The new setup is a 1/2/2/2 trick. That is, there are 4 frames to sidehop on, and all but the first give 2 frames to jumpslash on.
Details: Get roughly in the corner as shown. Position is not very precise I think, though you can roll into the corner if you want to be exact. Deku nut immediately after the backflip to stun the Skulltula while he is at the top. Hold shield after the jumpslash to prevent Link from sliding backwards. Sidehop left sometime after the B button 'hits' the bridge. Then jumpslash at the right time.
For the first frame sidehop (which you can tell because Link pops above the hole slightly), you need to jumpslash when the grass is crossing the screen boundary (1 frame). For the other sidehops, you want to sidehop as/after the ground on the left side leaves the screen (2 frames each).
You can use other visual cues, such as the corner of the broken web, as you prefer.
With this strategy, if you sidehop on the first frame as described, you will take 1 heart of fall damage, whereas if you sidehop later you will take 0.5 hearts.
Danny's Setup
A faster, but somewhat more difficult setup backwalks directly from the vines to throw the Deku Nut then turns around for the angle to jump from. This setup is a bit more challenging than the sockfolder setup because, after jumping, you have to maneuver Link in mid-air correctly, then turn around before sidehopping after landing on the web. With enough practice, however, this setup is fast and consistent.
Note that the frame window for jumpslashing can shift around depending on your sidehop timing.
Skulltula hover (backwards sidehop)
The best guide for this trick can be found in Torje's GIM tutorial at 5:01, timestamp linked here. This strat uses ISG to do a hover on a wall skulltula, then a backwards sidehop to land on the web, then a sidehop jumpslash to do anti-gravity and skip B1. A standalone, albeit old, video is below showing the steps as well, but for learning this trick Torje's tutorial is best, as mentioned.
B1 jump
It is possible to jump from the water in Basement 1 to the upper ledge, allowing you to get to the web and down to Basement 2. This is often used as a backup for failing an initial B1 skip strat.
If you are planning on doing one of these jumps, and not an anti-grav B1 skip, there are quick strats to jumpslash down, break the web, and recoil towards the B1 jump spot, see the video below. When falling to B1, if you hold target the second web will be loaded incorrectly and you can clip through it. In Glitchless clipping through the web is banned, so it's better to untarget when jumping down into B1 so you don't accidentally clip through the web.
Double recoil
Tsundere Jump
Extremely fast when done unbuffered, but is difficult unbuffered because of the frame perfect control stick input. In Glitchless AMQ it can be pause buffered without losing time, because Deku Sticks and Deku Nuts have to be equipped anyway, so it is very common in that category, either as a primary strat or a backup to the anti-gravity B1 skip.
Baker Setup
A fast setup without manual C-Up alignment, but requires an ESS turn.
C-Up Setup
A bit easier to execute than the Baker setup, with just the long roll at the end being a bit tricky. Uses a manual visual cue lineup in C-Up to get the angle, so without precise analog stick control (e.g. on emulators or VC without an ESS adapter) it can be a bit finnicky to get the correct angle. Still used by several runners as this setup has been around for a long time.
Jumpslash from ground floor
You can do a sidehop into the hole (after breaking the web) from the ground floor and jumpslash to get anti-gravity, similar to the anti-gravity B1 skips from the top floor. The video shows a setup from the Deku Tree entrance, but you can also manually line up the position and angle (shown as well). This is a fast strat after doing Gohma Double K.O. to return to the basement.
Deku Baba megasidehop
This method is useful, but slower than the ground floor anti-gravity above, after doing Gohma Double K.O. when returning to Gohma's room to do Ganondoor). If the upper web is gone, you can perform a megasidehop using the Deku Baba on the ground floor and recoil to the second web.
From entering Deku (see video):
- Turn right
- 2x sidehop left
- 3x neutral rolls (first one becomes a sideroll)
- 3x sidehop left
- Hold shield, get hit by Baba once
- Roll after Baba fully recoils and starts "chattering" again
- Left megasidehop
If you lose the initial position, you can align just to the left of the Baba (as you would end up with the above setup) and let the Baba push you a few times into the correct spacing, although this is definitely less reliable than the initial setup, and the timing of the megasidehop is liable to change based on your spacing to the Baba.
Old / Misc. methods
These are listed here for posterity despite having fallen out of use.
- Gold Skulltula Hover
- Gold Skulltula Hover + Megaflip
- Gold Skulltula Vine Clip
- Superslide Teleport (Adult)
- Torch Hookshot Clip (Adult)
- Chest Clip (Adult)
──── Basement 1 Strats ────
Web clip
Holding target while falling to B1 (either to the lower area with the water or to the higher ledge using a B1 skip) prevents the lower web from updating its collision properly, because the camera can not pan overhead. This allows you to clip through the edge of the second web.
This will fail if you let the camera pan when falling (i.e. untargeting before falling to B1) or also if you pause buffer an anti-grav B1 skip jumpslash. Jumping over the edge of the web's collision and onto the center also updates the web, so it will not work if you try again.
Clipping through the web is banned in Glitchless; you must burn the web even if the collision doesn't load properly at first.
Burning the B2 web
You may want to burn the second web instead of clipping through it, for example if returning after Gohma Double K.O., if you fail the web clip for any reason, or if you are running Glitchless. In Glitchless, because the clip is outright banned, if the web didn't load correctly (e.g. doing anti-grav B1 skip correctly, see Web clip for details), you should jumpslash onto the web with the burning Deku Stick.
Stick Jumpslash
By backflipping against one of the torches with a certain angle, Link will land briefly on the slope and slip off again, allowing you to jumpslash after the backflip. A well-timed jumpslash (depending on the setup) will ignite the Deku Stick.
The first video shows non-initial strats for both torches, as well as a crouch stab strat if you have sword which makes either torch very lenient (mashable). Frame data is shown in the video.
The second video shows an initial setup after performing Tsundere Jump. You can do this after the other B1 jumps as well, if you do another sidehop right after the sideroll.
Flame Storage
Not used much anymore, in favor of the stick jumpslash method. You can jump from the block next to the web towards the torch, then jumpslash with sword at the correct time to strike the top of the torch. If done correctly, when you pull out a Deku Stick, it will be on fire.
Using Fairy Bow (Adult)
Essentially obsolete at this point. Jump on the recovery heart chest by the torch, after hitting the switch, and pull out the bow. Shoot an arrow through the torch at the web to order to gain access to the second basement floor. (Video)
Crawlspace skip (Adult)
If you need the back room Gold Skulltula, Adult Link needs to get past the B1 crawlspace. The crawlspace skip utilizes a hover followed by a slope clip to get out of bounds near the crawlspace, then land "on" the crawlspace and get into the back room. It can be done with bombs or bombchus, and with or without hover boots, although each of these strats is different. Videos and notes for each combination are below.
Hover Boots
This is shown first because most routes get Hover Boots before this, and it is easier to perform with Hover Boots. Video below explains chu and bomb strats.
This strat uses a shield drop + backflip on the same frame, but if you do it unbuffered, you might get a 1 frame late backflip. In this case, there is a backup but only if you do certain things. For example, the sidewalks listed below are actually not required unless you want this backup frame to work. Also, the hookshot aim on the torch seems more precise if you want this backup frame to work. For more information on what the sidewalks do, watch dannyb's discussion of Link's stances at 1m50s in this video. The sidewalks are an easy way to guarantee right stance hovers.
- Get ISG, target wall left of the torch (angle 0xc000), and roll into the corner there
- Sidehop right and untargeted sideroll
- Hold down the hookshot (you can not tap the hookshot to fire it)
- Aim up until a visual cue (see video), then hookshot to land "on" the torch platform
- With Bombchus: Turn 180, target, and during a left sidewalk shield drop a chu + backflip same frame (see backup below)
- With Bomb: Pull and place bomb down, turn 180, backflip on big red bomb frame or the two frames before (i.e. lone red, big blue, big red) to hover
- Sidehop and equip Hover Boots
- Hold shield + downleft while in the air after the sidehop
- Release shield and A to roll just as Link clips through the ground. This roll should make it to the crawlspace if you timed it correctly.
- After landing on the edge of the crawlspace, quickly navigate around it and into the back room
If you backflip 1 frame after dropping the chu, your position won't work to sidehop and clip. You can visually confirm whether or not you are in the corner, and if you see that you aren't, you can do this backup:
- Sidewalk left and shield drop chu + backflip on the same frame (i.e. do the same hover again but make sure the backflip is correct this time)
- This time you will land lower but in the corner this time, and the trick is the same afterward
No Hover Boots
Without hover boots, you can't just clip out of bounds and then roll to the crawlspace. This method uses a second explosive to hover after clipping, after which you backflip onto the edge of the crawlspace and do some sidehops along the edge of the crawlspace.
- Start the trick and do the first hover the same way you would with hover boots (see above)
- With chus, make sure you get the shield drop + backflip on the same frame
- With Bombchus (first video below): Sidehop right then on first sidehop frame drop another chu
- With Bombs (second video below): Pull bomb, shield drop + sidehop right on 2nd frame of 2nd fast blue OR 1st frame of 3rd fast red (aka 6th blue, 7th red)
- For bomb, release shield after sidehopping until landing frame
- For either explosive, hold shield + sidehop right on the first frame Link lands, to hover out of bounds
- Backflip to crawlspace
- Sidehop right and immediately start holding left (you will get crawlspace cam)
- Now hold target + up and start doing moderately slow sidehops until you're in the back room
Back web skip (Adult)
Getting to the back room Skulltula usually requires burning the web, which may not be feasible in Bingo (if you are Adult and can't shoot arrows). You can skip the web as Adult using a bomb hover ground clip.
- ISG, target the web without targeting the baba
- Sidehop sideroll into the right corner facing the web
- (Untargeted) walk down for 2 frames (3 frames of down input), release stick
- Target, sidehop right, sidehop left and bomb + shield on 2nd sidehop frame
- Dry roll after landing, overhead shield drop 2nd bomb
- Backwalk (without holding shield!) into web until big blue frame of 1st bomb
- Backflip + shield on big blue frame
- Release shield after hover sticks
Back room Gold Skulltula hover (Child)
For Bingo, it is sometimes useful to do 4 Deku Skulltulas as Child Link. In this case, assuming you don't have the boomerang, you need to hover to this skulltula token.
──── 2-3-1 / Enter Boss Room ────
Fast 2-3-1 scrubs
There are many variations on a "fast scrubs" strat in the second basement. The strats depend firstly on how you fall into the room (with a jumpslash, with a sidehop, etc.), and are also a bit specific about the movement and the camera, as scrubs need to be loaded in a certain order and timing. The video below shows two strats from doing a jumpslash recoil through the water: first an easy, slightly slower scrubs strat, then a fast scrubs strat, timestamped at 26:21 here
Targeting the final scrub allows you to "catch" it from much further away.
2-3-1 skip megaflip
For most Adult Deku routes, this is the go-to method for entering Gohma's room. Using a megaflip, it is possible to ground clip towards Gohma's room through some collision on the second floor of Deku. It is also possible as Child, which is primarily useful for 100% with LACS wrong warp or Bingos in which you do Deku Tree with explosives.
Using hover boots we can get all the way into Gohma's loading zone from the megaflip. It is done from the second floor by the door to the Slingshot chest rooms; Adult Link can get up there quickly, by hookshotting from near the Deku Tree entrance straight up to the rightmost edge of the Map chest vines (see this video). There are two dominant setups for the megaflip; one is easier (but slower) and uses hover boots, the other is riskier and faster only when done unbuffered (which is difficult), but doesn't require hover boots.
Both Adult strats are shown with a bomb (which is more common), but you can use a chu simply by replacing the bomb neutral megaflip with a chu neutral megaflip (although the drop frames are nonstandard for the sideroll "No Hover Boots" strat), see this video for what that looks like.
Hover Boots (easier, slower)
Done from the wall to the left when facing the Slingshot room door. Be sure to be moving when targeting this wall, because it is not sticky. When getting in the corner at the start, you must get in the corner then do a dry roll, as indicated (just siderolling does not put you in the proper position). Also note the subtle dryroll against the wall after dropping the bomb; this is necessary because it changes Link's position by a slight amount.
- Target wall left of Slingshot door
- Sidehop right into corner, sideroll and roll again (for a dry roll)
- Sidehop left, drop the bomb in the middle of sidehop (not tight timing, just during sidehop)
- Dry roll into the wall, backflip, shield flick/retarget
- Neutral megaflip, equip hover boots while in the air (any time before you clip)
- Easy/slow finish: hold down (whole time, until you hit Gohma's room); after clipping when the Hover Boots run out and Link starts falling, then equip Kokiri Boots (window is more than 1 second)
- Fast/harder finish: (saves less than a second) as Link clips, flick right then hold target; after a short time (quarter second-ish), sidehop right (you can equip Kokiri Boots after a bit)
No Hover Boots (harder, faster)
Tough but reasonable to do unbuffered, but riskier than the above version because you can easily fall off the wooden bridge. There aren't many subtleties to this version, just be sure not to do a dryroll at the end, and use down-left for the megaflip input. Doing an ESS turn for the 180 after pulling bomb can make the megaflip roll timing work out very nicely. Setup begins in the leadup to the Slingshot room door, around the gap in the wooden bridge.
- Target the red wall before or after the gap in the bridge (angle 0xf562 or 0xf56c respectively)
- Turn 90 degrees right
- Sidehop left into corner
- Sidehop right, sideroll + retarget
- Shielded diagonal slash (targeted slash holding right)
- Sidehop right + pull bomb
- Turn 180 down
- Shield drop bomb
- Neutral roll, sidehop left, backflip (do not untarget)
- Sideroll neutral megaflip
- Hold neutral and do the jumpslash recoil
Jumpslash frames are shown in the video below, with the frame window being 3 frames earlier if you don't pull sword beforehand.
As Child
This strat can be done with a bomb or a bombchu as shown in the below video. This older video has an explanation of the post-megaflip inputs (release target, pull weapon (sword/stick), and hold right in the air before clipping) and the jumpslash frame. Unlike the jumpslash as Adult, this one is frame perfect, and you have to release to neutral on that frame as well.
HESS 2-3-1 skip (Adult)
A bit faster than doing the megaflip ground clip, but difficult. Mainly an IL strat.
Adult 2-3-1 skip (from back Skulltula)
There are a few ways to perform the 2-3-1 skip into Gohma's room from the back B1 rooms, after getting the gold skulltula (as Adult). The current most common option, used by most 100% runners, is a superslide teleport to get underground, followed by a precise chu megasidehop into Gohma's room. The video shown below uses a Deku Stick, but the Hammer can be used in place of a stick (e.g. on N64).
There is another strat, which does a precise slope clip using a 1 bomb superslide. There is some more complex frame data to remember, but this strat is useful if you don't have bombchus for any reason.
Adult 2-3-1 skip (Compass room)
Although it is less common nowadays, with the compass room a bit out of the way, this remains a relatively easy way to get into Gohma's room as Adult, and can be fast in some bingo rows. This uses the moving platforms in the compass chest room to get out of bounds; after you hit the switch to raise the platforms you are on a (very lenient) timer to complete the setup.
- Hit switch, target wall next to switch (0x71e8), turn 180
- Do not release target throughout the entire trick
- Sidehop right to corner
- 2 left sidehops, backflip
- Hold forward to walk and jump to the platform ledge, let go of up (grab the ledge, don't climb up)
- When the platforms go fully down, press A then B (not same frame) Frame data: if you have sword in hand, do not jumpslash on the frame after pressing A, but the next 11 frames work. If sword is not out, you can press jumpslash on the frame after A, and only 8 frames work.
2-3-1 scrubs with Hammer
A pretty niche strat thanks to the many 2-3-1 skips that exist, but if you need to do the scrubs and you have hammer (e.g. failing Ganondoor as Adult), this is a fairly fast method. It's a bit specific because it requires the proper scrubs to be culled at the proper times.
──── GIM ────
Get Item Manipulation (GIM) can be done in Deku Tree to get a Blue Potion and Light Arrows. This is used in the current No Wrong Warp (No SRM) route to skip getting the Kakariko cucco bottle and skip getting Light Arrows from RBA. First, a position/angle setup is used to vine clip into out of bounds water using the basement Gold Skulltula, which allows the camera to be locked while swimming. Then dive cancel is used to get item delay when picking up a Deku Nut drop from the nearby Deku Baba. From there, certain actions including being within range to open a chest will manipulate the item that Link is expected to receive. For the Deku Map chest, the item becomes Blue Potion; for a recovery heart chest, the item becomes Light Arrows. Jumping into deep water again and resurfacing removes the dive cancel state, allowing the delayed item pickup to finish with the newly manipulated item value.
Blue Potion / General tutorial
Below is Torje's full GIM tutorial for an old Any% (later Defeat Ganon) route, which is the most comprehensive guide on performing the trick, with timestamps in the video description (GIM-specific techniques start at 6:51).
Light Arrows
GIM can also be used to obtain Light Arrows in addition to the Blue Potion, which is not covered in the above tutorial. After manipulating the item at the Map chest, the vine clip is repeated and you receive Blue Potion when landing in the out of bounds water, at which point you do another iteration of dive cancel and item delay. This time instead of going to the Map chest, jump from the Deku Baba area to the other platform with the switch and the web. Jumpslash into the web by the recovery heart chest to briefly put Link within range of the chest, manipulating the item value to Light Arrows, then jump into deep water again and surface.
──── Wrong Warps ────
If you are new to learning wrong warps, you will want to keep in mind the following things:
- The end of dungeon cutscene is what makes the wrong warp happen; if you're practicing on a file that already watched the cutscene, it won't work.
- Wrong warps are susceptible to crashes/softlocks due to invalid cutscene data. Each wrong warp might have a specific cutscene requirement or some trick to prevent a softlock, be sure to take note of them below.
Ganondoor (Deku to Collapse)
"Ganondoor" is the famous Wrong Warp from Gohma's room to the Ganon's Tower Collapse, using the exit of Gohma's room into the Deku Tree basement. This trick is frequently useful both in RTA categories and Bingo, and is frequently useful as Child or Adult. For these reasons, the trick has accumulated a number of setups over the years. This page will cover the most common modern setups, including bomb OI strats as Adult Link. These setups assume that you have reloaded the boss room to remove the mud wall blocking the hallway. See the Gohma page for boss strategies that also reload the room, or simply savewarp after defeating Gohma and fix the cutscene pointer using the pause trick (read the paragraph below).
Cutscene Pointer note: This trick will softlock if your last watched cutscene is not the Deku Tree intro cinematic (or certain other cutscenes which usually aren't relevant). This almost always occurs either when practicing in gz or after quitting to the title screen at some point after entering Deku Tree. You can fix this using the "pause trick", or if you're in gz you can use clear cs pointer in the warps menu. Full explanation by mzxrules linked here.
- As Adult, pause the game inside Gohma's room before doing the wrong warp.
- As Child, pause the game inside Link's House, except on certain versions.
- For Japanese 1.1, PAL German, or PAL French, pause in the House of Twins (closest house to Deku Tree, across from Kokiri Shop)
Also note when practicing on gz (the practice ROM):
The speed that Link will walk through doors with loading zones is dependant on how fast he entered the last loading zone. This is important for performing the Wrong Warp, because if Link doesn’t walk through the door at the right speed at the end of the setup, the warp timer value will not be correct.
In a run context, the last loading zone before Gohma is entering the Deku Tree. This loading zone has a hard coded speed. No matter how fast or slow you enter it, it is the same. This means in runs you have nothing to worry about. However, in practice, if you warp to Gohma's room with the Practice ROM, chances are your warp speed is off and it will not work. You need to warp to Deku Tree then warp to Gohma for your loading zone speed value to be correct.
As Child
The video below by Torje is the current best resource for Ganondoor as Child Link (usually in the context of Defeat Ganon speedruns). It goes over the setup(s), what the failure conditions look like, and frame data for every part of the trick. At 6:09 in the video, note the easier setup for the Ocarina Items, which doesn't rely on good backflip timing out of a backwalk and is a very good option for new runners or for more consistency.
This is a very common glitch for new runners to learn. One common "mistake" many make is not walking perfectly to the right, usually as a result of a controller that doesn't have notches. Most runners play on the Gamecube controller, N64 controller, or Wii Classic Controller Pro, which have notches for the 4 cardinal directions and 4 diagonal directions.
Nutless
This setup can be done with sword or Deku Stick and doesn't require nuts, making it a very flexible option, although it's a bit slower and more precise on the timing (3 frames to slash, shown at end of video). With sword, the frames to slash are 1 later than is shown in the video.
As Adult
Door crush to reload room
After the fight as Adult, Gohma's room is usually reloaded by getting crushed inside the door / mud wall blocking the hallway. The standard setup is shown below in the video; take special note of two things: the first bomb must be dropped overhead, and the second bomb must be pulled quickly after the backflip (lenient, just don't pull it very late or after landing).
Bottle OI (uses Deku Nuts)
The video below is a good demonstration of something very similar to the standard Child Link strat, with the setup being 7 backflips from the door, a dryroll, then backflip OI. Unlike the Child strat, after you sidehop fully into the corner, you then do a backflip followed by a shielded jumpslash before opening the door. The video also shows many adjustments for early/late 1st nut throws; it is worth it to learn the early frames adjustment (hold shield after second nut throw) just in case, but mainly you are aiming to hit the "normal" working frames.
Bomb OI (uses Hammer)
Bomb OI does not work on the 1.0 version.
Initial position after Gohma wall crush
Non-initial position
Deku to DC
Dying in Gohma's room will return you to the Deku Tree entrance, which combined with the blue warp cutscene causes a wrong warp to the entrance of Dodongo's Cavern. Of course, these setups use explosives to die while on the blue warp, so you need to be at 0.5 hearts or less.
Cutscene Pointer:
- Deku Tree intro always works.
- Hyrule Field intro always works.
- Title Screen requires the "pause trick". See the details in Ganondoor.
- As Adult, usually pausing is done in Gohma's room anyway to buffer the trick.
As Child
Bomb
The video shows a setup without reloading the room, with the blue warp from successfully one-cycling Gohma.
Bombchu
As Adult
Bomb
Initial position
Requires the successful Gohma one-cycle.
Non-initial
If you fail the Gohma one-cycle, reload the room (e.g. by getting crushed on the Gohma door, see Ganondoor) and use this setup.
Bombchu
With a bombchu, it is fast to do the Hover Boots backflip OI method pause buffered, shown below (it can also be done after reloading the room, so it's flexible). You can also do this setup after one-cycling Gohma.
Wrongo Bongo (Deku to Bongo)
Wrong warp to Bongo Bongo's boss room is done by reloading Gohma's room by voiding (or, rarely, using a timer expiration) at the same time as taking the blue warp. Most setups use the boomerang to manipulate the camera after falling out of bounds to load the blue warp, but it can also be done by getting crushed by the Gohma wall (shown in Adult). None of the setups shown reload the room before doing the wrong warp, because they use the Gohma wall.
Cutscene Pointer:
- Deku Intro does not work.
- Title Screen always works.
- Hyrule Field intro always works.
- Minuet of Forest warp should often work. It's possible to get a bad heap in Kokiri Forest if you haven't beaten Forest Temple.
- Bolero of Fire warp works only if you haven't beaten Forest.
(needs verification on non-1.0 versions)
Void out as Child
with Bombs
Initial position
This setup requires Deku Stick, Bombs, Boomerang and does the blue warp OI from a initial position.
Non-initial position
Bombchus only
This is an initial setup only. Used in Bongo as Child RTA before dynawarp was discovered.
Void out as Adult
Initial position
Non-initial position
Wall crush as Adult
The video below by bakeneko is the best full demonstration of this strat, but it's showing a backup for if you don't 1-cycle Gohma. Use this setup for the correct blue warp position (normal 1-cycle kill), and see SVA's strat at the top of the wall which is also shown in the video below.
Timer Expiration
Heap Credits Warp
It is possible to do a complex heap manipulation in Kokiri Forest such that the Minuet of Forest cutscene pointer will point to valid cutscene data and cause the Deku to DC wrong warp to play an ending credits cutscene.
To perform this, it is important to savewarp to load the Title Screen, which is on the Hyrule Field scene, then load the file and play Minuet of Forest. The heap setup starts from there (and requires Forest Temple to be completed already. There is an explanation here.
Heap setup
The video shows the current standard setup.
Unbuffered Deku to DC wrong warp
The cutscene data will be corrupted by pausing in Gohma's room, so this must be done unbuffered. The most viable way in RTA is to have Hover Boots and Bombchus equipped beforehand, then do a backflip onto the blue warp, doing OI with a bombchu and shield dropping the bombchu 2-3 frames before landing on the ground, and only pressing shield for 1 frame so that the Ocarina Items comes out.
Ganondoor credits warp (slower/easier)
You can also do Ganondoor if you don't want to do the unbuffered chu backflip seen above. It's a bit easier to do this with the pause limitation in Gohma's room. To reload the room, use the Adult ground clip from the video below then use the bottle OI setup with Deku Nuts shown in the Ganondoor section, because bomb OI is difficult unbuffered.
LACS Wrong Warp
It is possible to do a heap manipulation in Kokiri Forest, similar to the above credits warp, but to manipulate cutscene data such that the Zelda flashback in Light Arrows cutscene is played. This skips becoming Adult as the cutscene sets your age to Adult, and it also skips watching most of Light Arrows cutscene.
The basic premise is to savewarp to Link's House, hover to enter Deku Tree to clear the intro cutscene, then leave. From there you do a heap setup in Kokiri Forest (which is dependent on previously collected permanent rupees, as well as having done Child ZL) and inside Deku Tree. Then Ganondoor or Deku to DC will cause that section of LACS to play, and you will end the cutscene as Adult Link with Light Arrows.
The video below shows the most current setup. There is a faster angle setup inside Deku Tree linked here. This setup requires Child ZL done to set up Kokiri Forest correctly, as well as already having collected the standard rupee route (collect bridge blue rupee). Slingshot doesn't affect the setup but is required for 100% so it was shown in the below video.